Improving Crosslight App Performance with Compression Filter
In my post last month, I mentioned about data optimization feature in Crosslight 4 which could greatly improve the overall performance and experience of your Crosslight apps. So here we are, this week’s post will feature this optimization feature, and you will learn how to apply it to your apps. Read on.
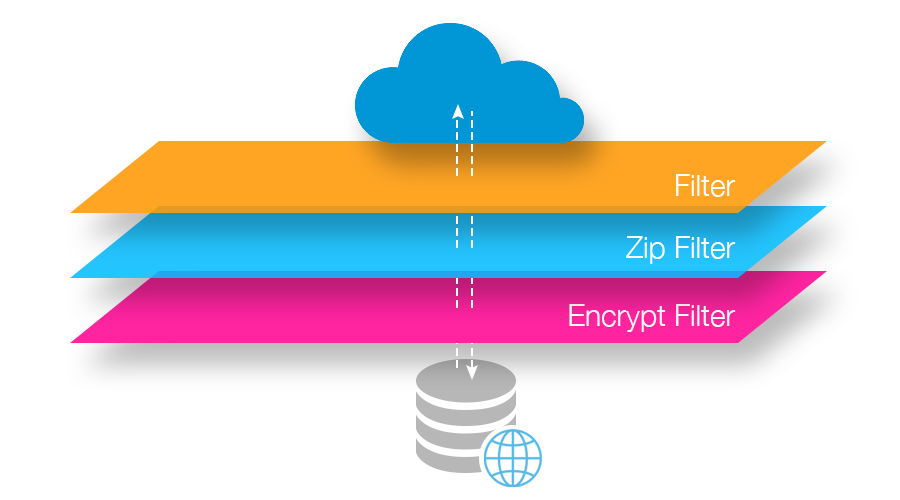
In Crosslight 4, we shipped a lot of new stunning components like charting, barcode reader, dialog presenters and much more. But that’s not all. We also pay a lot of attention on small and unseen areas such as the data framework, logging, and view projection. In fact, no feature is too small. For instance, the new extensible filters in RestClient enable you to add request and response compression and make your apps work 75% faster, particularly if you’re building enterprise apps that sync relatively large data. Let’s see how it works.
Adding a new request or response filter to the RestClient is extremely easy, thanks to the new, intuitive API. Here’s how:
|
1 2 3 4 5 6 7 8 9 |
this.GetService<IActivatorService>().Register<IRestClient>( c => { RestClient restClient = new RestClient(appSettings.RestServiceUrl); restClient.AddRequestFilter(new GZipRequestFilter()); restClient.AddResponseFilter(new GZipResponseFilter()); return restClient; }); |
If you’re using Crosslight App Framework, you can simply add the code in the AppService class where all container registrations are defined. The Rest client in the entire app will automatically have the filters applied.
Since the filter is provided as interface, you can plug any capabilities you desire, whether it is a compression filter, an encryption filter, etc. In this case, let’s not reinvent the wheel. We’ll just grab an existing Microsoft.Bcl.Compression library from NuGet. Here’s an example how we can extend a third-party library to work with our filter interface:
|
1 2 3 4 5 6 7 8 9 10 11 12 13 14 15 16 17 18 19 20 21 22 23 24 25 |
public class GZipRequestFilter : GZipFilter, IRestRequestFilter { public void Filter(IRestRequest request) { request.AddHeader("Accept-Encoding", "gzip, deflate"); Parameter requestBody = request.Parameters.Where(o => o.Type == RequestParameterType.RequestBody).FirstOrDefault(); if (requestBody != null) { request.AddHeader("Content-Encoding", "gzip"); requestBody.Value = this.Compress(requestBody.Value.ToString()); } } } public class GZipResponseFilter : GZipFilter, IRestResponseFilter { public void Filter(IRestResponse response) { Parameter contentEncoding = response.Headers.Where(o => o.Name == "Content-Encoding").FirstOrDefault(); if (contentEncoding != null && contentEncoding.Value.ToString().ToLowerInvariant() == "gzip") response.Content = this.Decompress(response.RawBytes); } } |
As seen above, we can just extend an existing class, say, the GZipFilter class, then implement the IRestRequestFilter and IRestResponseFilter. Both interfaces require an implementation of Filter method, that’s where you perform the actual logic of the filter.
On the server-side, if you’re using IIS for the web server, then you can just enable the dynamic compression feature. Afterward, the WebAPI response will be automatically compressed.
One thing to note though, WebAPI doesn’t automatically recognize the compressed requests. Fortunately, Microsoft already has a NuGet package for that. So we’ll just grab the ASP.NET WebAPI Compression Support, then add the following code to the WebAPI config class.
|
1 2 3 4 5 6 7 8 |
public static class WebApiConfig { public static void Register(HttpConfiguration config) { // Web API configuration and services config.MessageHandlers.Insert(0, new ServerCompressionHandler(new GZipCompressor(), new DeflateCompressor())); } } |
Pretty easy, right?
Based on performance test on one of the apps we built for our enterprise client, enabling the compression filters speed up our apps performance by nearly 4x. Previously, in certain case, the app took 9 minutes to synchronize a thousand of data over the Edge connection. With compression enabled, the app only took only 2 minutes to sync the same set of data over Edge, and only a few seconds over Wifi. The user couldn’t be happier. So we hope you can do the same too, your users will thank you so much.
To see the feature in action, pull the sample from our Git, and play around with it. The feature is also fully documented, which you can find here. Happy optimizing!
Best,
Jimmy
