Building Inventory Tracker Apps with Crosslight
The Inventory Tracker sample shipped with Intersoft Mobile Studio is a great reference sample that simulates the real-world condition of how a basic, yet still providing a great user experience app should be. The Inventory Tracker is designed for workers that in a warehouse who want to track the items they have in store. The sample provides intuitive CRUD operation that extends beyond common applications with CRUD functionality. Some details are meticulously considered and thoughtfully designed to provide the user with a great form input experience, when usually form inputs have an impression of being a boring chore.
This blog post aims to elaborate the details that made this reference sample app different from other app with form inputs in the market, while exposing the features of form builder built into Crosslight framework. By just defining one form metadata, you can rest assured that the forms you create in one platform will easily work in another and provide a great and consistent user experience.
Supports Multiple Platforms
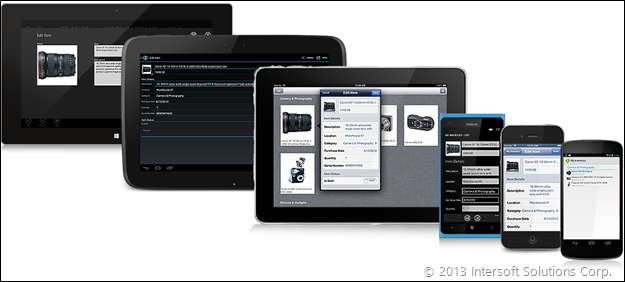
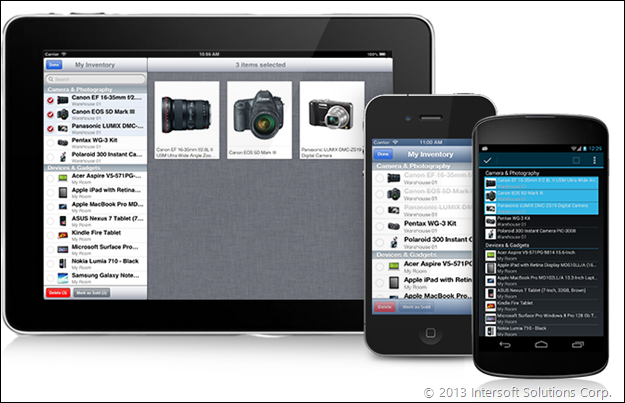
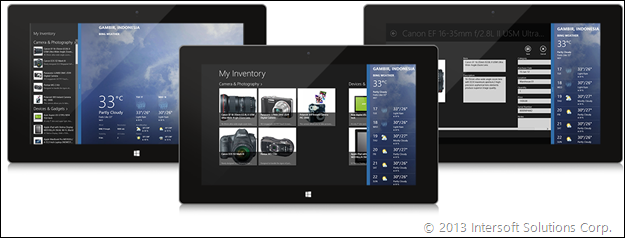
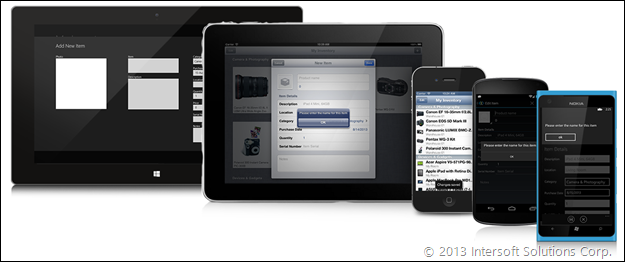
The Inventory Tracker sample runs on a shared application logic, and runs great on iOS, Android, WIndows Phone and WinRT, while conforming to each platform UI guidelines. The sample does not enforce the same design throughout different platforms, this is because different platforms have different design guidelines and if you try to imitate one platform’s experience with another, this would greatly crimp the user experience.
Automatic Rotation Handling
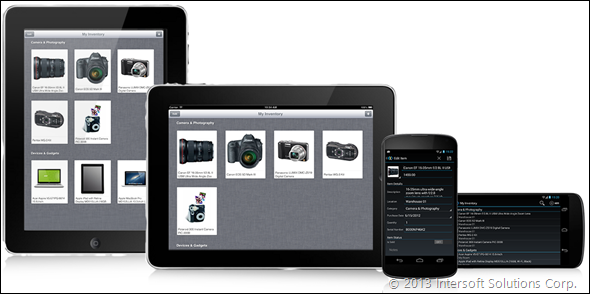
The Inventory Tracker responds fluidly to orientation changes, while keeping the bindings intact. Take Android for example, by standard measures, you would have to eventually store the values entered by the user back and forth yourself every time the Activity is recreated after rotation. Handling this scenario will definitely take a lot of your precious development time. Crosslight has taken care of this from the back-end, so you can rest assure that your data integrity is maintained even after countless orientation changes and the bindings will remain intact.
Master-Detail Navigation
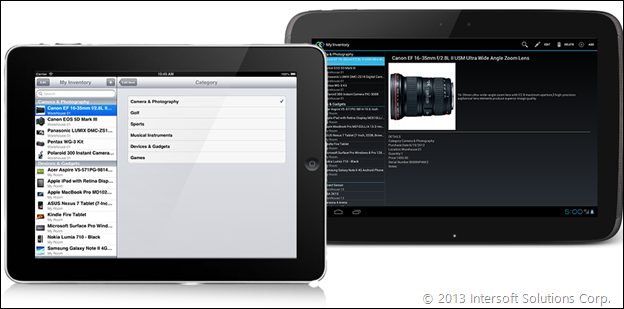
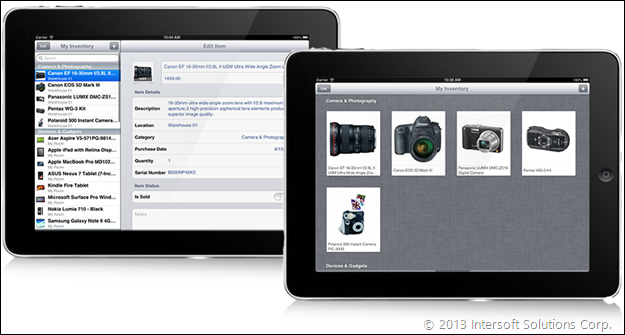
The user experience when using a tablet must differ, as you have more screen estate to utilize. In a tablet, you would probably want to split the screen into two parts, a smaller left portion for the items list and the rest of the screen for the detail view. The Inventory Tracker executes this scenario beautifully by adapting itself to tablet devices, using a single codebase. Try to deploy the sample on a tablet device or emulator and see for yourself. More importantly, Crosslight ships with this template by default, so you can easily create such experience with greater ease.
Powerful Data Bindings
By default, when you are either in add new item screen or editing an item screen, the bindings are set two-way by default. This allows hassle-free editing of items, and the changes made truly reflects the underlying model of the item. The add item command and the save item command are also bound to the button using the robust data binding feature introduced by the form builder of the Crosslight framework.
Versatile Visibility Bindings
When adding new items using the form metadata, you can hide a specific section using the visibility binding attribute. The item form metadata has a specific SoldSection that can be hidden during addition of new item, since it would be counter-intuitive if you add a new item then immediately mark that item as sold.
In the editing item screen, when the IsSold switch is turned on, the Sold Date property immediately responds by making the sold date editor to visible, on the other hand, when the IsSold switch is turned off, the sold date editor is hidden from the view. This is possible because of the solid MVVM binding framework introduced in Crosslight.
|
1 2 3 4 5 6 7 8 9 10 11 12 |
public class SoldSection { [Editor(EditorType.Switch)] [Display(Caption = "Is Sold")] public static bool IsSold; [Display(Caption = "Sold Date")] [Editor(EditorType.Date)] [VisibilityBinding(Path = "IsSold")] [Binding(StringFormat = "{0:d}")] public static DateTime SoldDate; } |
Batch Operations
You can execute batch operations on multiple items at once, for example, deleting multiple items at once, or marking them as sold. When marked as sold, the UI immediately responds by giving the label a strikethrough effect to provide a solid user experience. Batch operations allows for greater time saving when executing redundant operations for a batch of items. Apps developed using Crosslight will save a lot of time, not only for you, but also for the users of your app.
Data Presentation Variations
We have shipped two different variations for the iPad version. The first variation of Inventory Tracker sample presents the list of items in a master-detail fashion, whereas the other one showcases the items in a grid-view like structure. These two samples follows the Apple HIG (Human Interface Guidelines) for iPad, therefore giving users a better experience when using the app. Editing screen is also shown differently, one in a detail view, whereas the other one in a popover controller.
Efficient Memory Management
The list view introduced in Inventory Tracker sample highlights one of the most important feature that a listing app should have: efficient memory management. This feature is efficiently achieved through smart cell reuse, all done in background. The table cell gets reused when it is out of the view, so you don’t have to worry of having a large amount of footprint when your item list gets too large. All you have to do is provide the items source in the view model and let Crosslight do the rest. Did I forgot to mention that you can freely customize the item template yourself?
Built-in Search
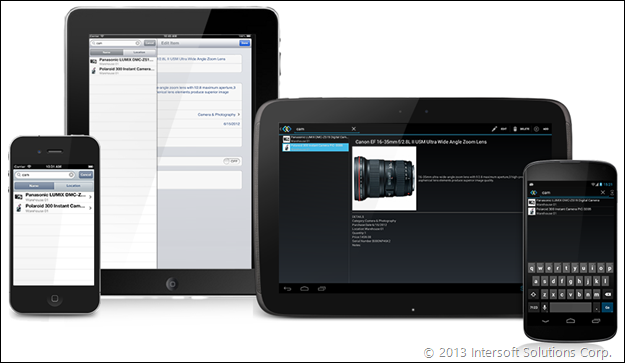
If you have hundreds and thousands of items in the list, how can you filter items accordingly? Well, the Inventory Tracker for Android and iOS platforms are shipped with a powerful built-in search feature that allows you to filter items in a fast, efficient manner. On iOS, items are filtered along as you type, so you can quickly choose an item when it comes to view. On Android, the items will be shown at the exact same time after you have hit the search button on your keyboard.
Powerful Image Picker Editor
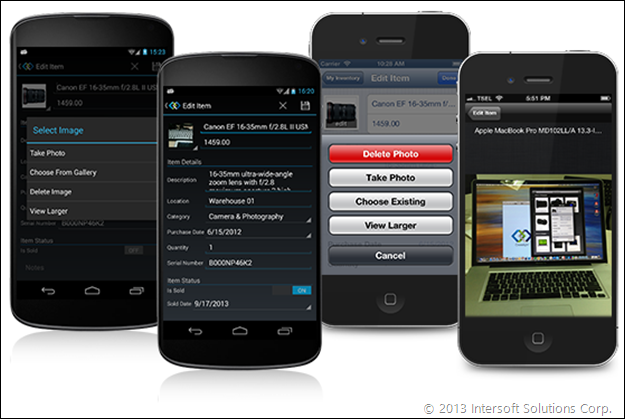
Inventory Tracker ships with a powerful image picker editor that allows you to take pictures from the device camera, with added support for cropping and scaling, native to the platform level. More importantly, this is all done just by defining the form metadata using the form builder. You can also add your own custom logic after the you have retrieved the image from the camera by defining commands from the view model.
The Form Metadata definition:
|
1 2 3 4 |
<p> [ImagePicker(ImageResultMode = ImageResultMode.Both, ActivateCommand = "ActivateImagePickerCommand", PickerResultCommand = "FinishImagePickerCommand")] public static byte[] ThumbnailImage; </p> |
You can intercept the commands in the view model:
|
1 2 3 4 5 6 7 8 9 10 11 12 13 14 15 16 17 |
private void ExecuteActivateImagePicker(object parameter) { ImagePickerActivateParameter activateParameter = parameter as ImagePickerActivateParameter; if (activateParameter != null) { activateParameter.CustomCommands = new Dictionary(); activateParameter.CustomCommands.Add("View Larger", this.ViewLargeImageCommand); } } private void ExecuteFinishImagePickerCommand(object parameter) { ImagePickerResultParameter resultParameter = parameter as ImagePickerResultParameter; if (resultParameter != null && resultParameter.Result != null) this.Item.LargeImage = resultParameter.Result.ImageData; } |
Intelligent Layout Awareness
Apps built on the WinRT platform introduces many visual states that many apps might forget to cover: landscape, filled, snapped and portrait. In the WinRT version of the Inventory Tracker sample, we have covered this scenario in depth, while introducing the wrapped LayoutAwarePage that smartly responds to the various screen states introduced in WinRT platform.
|
1 2 3 4 5 6 |
<p><VisualStateManager.VisualStateGroups></p> <p> <!-- Visual states reflect the application's view state --><br> <VisualStateGroup x:Name="ApplicationViewStates"><br> <VisualState x:Name="FullScreenLandscape"/><br> <VisualState x:Name="Filled"/></p> <p> <!-- The entire page respects the narrower 100-pixel margin convention for portrait --><br> <VisualState x:Name="FullScreenPortrait"><br> <Storyboard><br> <ObjectAnimationUsingKeyFrames Storyboard.TargetName="BackButton" Storyboard.TargetProperty="Style"><br> <DiscreteObjectKeyFrame KeyTime="0" Value="{StaticResource PortraitBackButtonStyle}"/><br> </ObjectAnimationUsingKeyFrames></p> <p> <ObjectAnimationUsingKeyFrames Storyboard.TargetName="ItemGridView" Storyboard.TargetProperty="Padding"><br> <DiscreteObjectKeyFrame KeyTime="0" Value="96,137,10,56"/><br> </ObjectAnimationUsingKeyFrames><br> </Storyboard><br> </VisualState></p> <p> <!--<br> The back button and title have different styles when snapped, and the list representation is substituted<br> for the grid displayed in all other view states<br> --><br> <VisualState x:Name="Snapped"><br> <Storyboard><br> <ObjectAnimationUsingKeyFrames Storyboard.TargetName="BackButton" Storyboard.TargetProperty="Style"><br> <DiscreteObjectKeyFrame KeyTime="0" Value="{StaticResource SnappedBackButtonStyle}"/><br> </ObjectAnimationUsingKeyFrames><br> <ObjectAnimationUsingKeyFrames Storyboard.TargetName="PageTitle" Storyboard.TargetProperty="Style"><br> <DiscreteObjectKeyFrame KeyTime="0" Value="{StaticResource SnappedPageHeaderTextStyle}"/><br> </ObjectAnimationUsingKeyFrames></p> <p> <ObjectAnimationUsingKeyFrames Storyboard.TargetName="ItemListView" Storyboard.TargetProperty="Visibility"><br> <DiscreteObjectKeyFrame KeyTime="0" Value="Visible"/><br> </ObjectAnimationUsingKeyFrames><br> <ObjectAnimationUsingKeyFrames Storyboard.TargetName="ItemGridView" Storyboard.TargetProperty="Visibility"><br> <DiscreteObjectKeyFrame KeyTime="0" Value="Collapsed"/><br> </ObjectAnimationUsingKeyFrames><br> </Storyboard><br> </VisualState><br> </VisualStateGroup><br> </VisualStateManager.VisualStateGroups></p> |
Tactical Use of Presenters with Data Validation Support
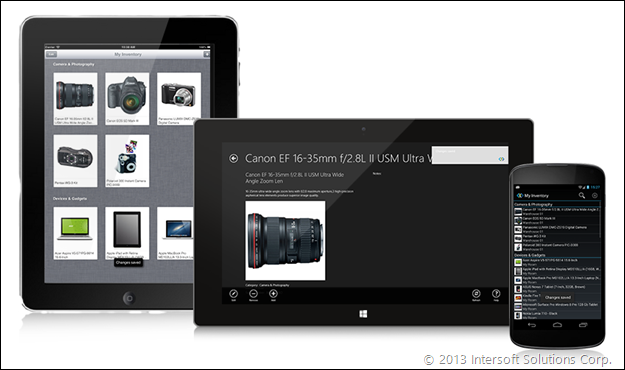
The Inventory Tracker sample offers data validation support with targeted use of presenters. For example, when you try to add an item and you have not entered a product name, a message presenter will be shown, notifying the error. Also, a toast presenter will be shown after you have finished editing. This subtle, yet important toast message informs the user that changes have been made and saved successfully. Giving users the right feedback at the right time is one of the key fundamentals of creating a rich experience for the users of your app. More importantly, you can be invoke the toast presenter from the view model, making sure that all your apps behave in the same, consistent manner.
|
1 |
this.ToastPresenter.Show("Changes saved."); |
Wrap-Up
Now you have just seen the features exposed in the inventory tracker sample. This is great news for you because you can easily obtain the same user experience in your app by utilizing the powerful form builder feature in Crosslight. The form builder feature allows you to build forms in minutes, just by specifying partial class for the model which acts as the metadata and giving the corresponding attributes. You can try all of this exciting features by grabbing a copy of Intersoft Mobile Studio from this link: http://www.intersoftpt.com/RequestTrial. Learn more about Crosslight at: http://www.intersoftpt.com/Crosslight/.
Cheers,
Nicholas Lie
|
1 |
Hi Nic;
Very impressive client side features (love the visibility bindings). A while back I had asked Jimmy, how XLight as a “Client” get to consume data from from server(s) and he he comment, “We provide end-to-end solution”. No fancy client is complete without a robust middle tier and back-end setup.
So, could you please cover how xLight work with back-end services and how the client side’s models have a full understanding of the back-end object graph?
Thank you in advance!
..Ben
Hi Ben,
About data, we have a comprehensive roadmap on it for October updates. We cannot reveal much details on it for now, but we’ll definitely make it right. Stay tuned.
Cheers,
Nicholas Lie
Hello again;
Second question; As you know more and more third parties are developing components for Xamarin framework http://components.xamarin.com/
My question is (based on the last blog answer that components in xLlight are based on Metdata and not direct components used), can we use third party components in xLight? i.e. a component that automates taking pictures and provides nice API?
Thanks!
..Ben
Hi Ben,
As Crosslight is extensible in nature, yes, you can use third party components in conjunction with Crosslight. You can even build your own view buliders for your own custom controls, create your own presenters and services, for example, to extend Crosslight’s functionality together with the metadata feature.
Cheers,
Nicholas Lie
Thanks for the replies and info. Fair enough on Oct. update.
Another very important subject is the membership and security. As you know, MSFT has redeveloped a new membership that is based on OWIN platform that allows ASP WebForm, MVC, WebAPI, SignalR and other clients like iOS and Android to use thus new membership. Unlike the old WebForm Membership that you couldn’t use with other clients.
So, my question is, does xLight support this new membership at the client side and if so, how much built-in features are in xLight, so developers can take advantage to know how to authenticate user, give permission based on roles and disable features and etc.
I have not seen any info on te security and Authentication.
Thanks!
..Ben
As they say, a picture is worth a thousand words and a video is worth a thousand pictures…
To save you a million words, can you show us in video, how a UI form is created at design time? Intersoft has always been famous for creating eye catching UIs, now show us how we do that with xLight?
Thanks!
..Ben
Ben, would you please start new discussion at the Crosslight forum? http://www.intersoftpt.com/Community/Crosslight
That will allow our response to be useful for others who are having similar questions.
Thanks,
Jimmy
Sure Jimmy!
Thanks