Time Interval in WebScheduler
In Day, Week, and Split view, the scheduler part is divided into two areas: all-day area and hour area. In previous version of WebScheduler, the hour area is always displayed in 30-minutes interval and cannot be modified to other time interval options. In version 3, WebScheduler allows you to alter this configuration with various predefined time interval options.
The available time interval options are 10 minutes, 15 minutes, 30 minutes, and 60 minutes, which can be set using ViewSettings >> DayView/WeekView >> TimeInterval property.
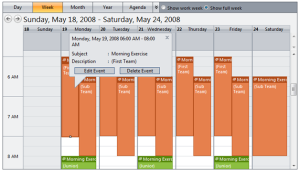
The screenshot shows 15-minutes interval in Week view. In 15-minutes time interval, one hour duration is divided into four rows; each row indicates 15 minutes duration. Note that the height of all events is also adjusted to the active time interval in the view.
The time interval specified in Day view can be different with the one specified in Week view, however since Split view uses the same configurations as Day view, the time interval options specified in Day view will be used in Split view.
When time interval options are listed in context menu, users can easily change the active time interval by selecting one of the options in the context menu. Once it’s changed, WebScheduler will automatically re-render its view and events, adjusting to the selected time interval. To include the time interval options in context menu, simply enable IncludeTimeIntervalInMenu property.
The time interval options listed in context menu can be seen in this screenshot. The active time interval is indicated by a checked sign in front of it. When the property is disabled, these options will not be included in context menu, thus users are not allowed to change the active time interval of the view.
Multiple cell selection is an innovative feature which enables user to block a certain date range and quickly create a new event based on the selection. Now, it is enhanced further to work in conjunction with time interval feature. When users select multiple cells, the duration of selected date range will automatically be adjusted to the active time interval. The duration of the selected date range can be easily seen in the callout header.
You can also set time interval programmatically in client-side, using SetTimeInterval function.
|
1 2 3 4 5 |
function SetInterval() { var s = ISGetObject("WebScheduler1"); s.SetTimeInterval("Minutes60"); } |
In Build 2, scheduled to be release this end of January 2010, SetTimeInterval API is enhanced, adding one parameter, viewMode. It basically enables you to select which view mode and what time interval to be applied. For example: if the current view mode is Day view and you want to apply the 60-minute interval to Week view, you can use the following code.
|
1 2 3 4 5 |
function SetIntervalToView() { var s = ISGetObject("WebScheduler1"); s.SetTimeInterval("Minutes60", “Week”); } |
WebScheduler will smartly detect whether the assigned view is the current view. If it’s not, the scheduler will not be refreshed, thus preventing unnecessary processing. The 60-minutes time interval will be rendered automatically in Week view when users navigate to Week view. If the viewMode parameter is not specified, the new time interval is applied to the active view.
As explained above, WebScheduler’s time interval is view dependent, which means you can have different time interval configuration in different views. However, there are certain scenarios which require synchronized interval settings. SynchronizeTimeInterval property is introduced in Build 2, offering built-in time interval synchronization. This means, when users change the time interval in Day view to 15-minutes and switch to week view, the time interval in Week view will be set to 15-minutes as well, and vice versa.
Using time interval feature implemented in WebScheduler, users can view the schedule easier and more flexible.


