Cross Platform Mobile Development with Crosslight – Part 2
This is the second post of cross-platform mobile development with Crosslight series. Continuing from the previous post , I am most pleased to share two of the exciting features shipped with Crosslight: unified navigation framework and powerful data binding.
Unified Navigation Framework
As navigation differs from one mobile framework to another, it’s a challenging task for mobile developers to streamline the navigation logic all in one place that can work consistently between platforms. Take iOS, Android, Windows Phone, and WinRT for example. iOS uses push navigation while Android uses Intent-based navigation while Windows Phone and WinRT use Page-based navigation. Gone are the days you will have to worry about these troubles with Crosslight. This section will outline the features supported by Crosslight navigation framework.
Basic Navigation
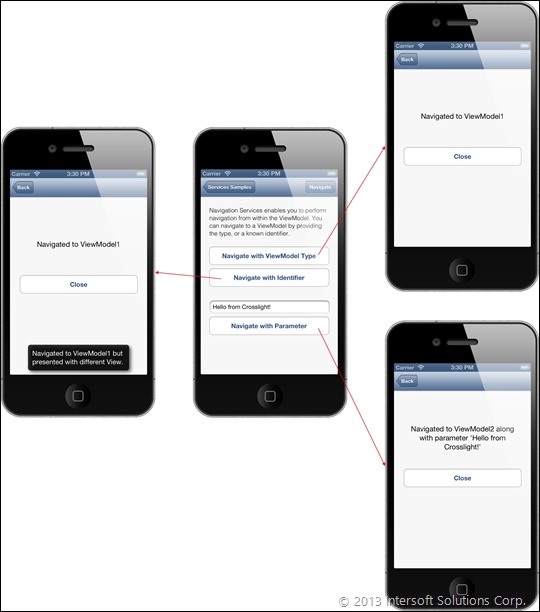
Crosslight navigation supports basic navigation to a page using the view model. This is achieved using the navigation service from the view model and calling the Navigate method then specify the desired view model to navigate. It’s as simple as that.
At its simplest form, basic navigation can simply be done with the following simple calls from the view model:
|
1 2 3 4 5 6 7 8 9 10 11 12 13 14 15 |
private void ExecuteNavigateIdentifier(object parameter) { this.NavigationService.Navigate("ViewModel1Derivative"); } private void ExecuteNavigateParameter(object parameter) { // You can pass any objects as parameter during navigation this.NavigationService.Navigate(new NavigationParameter(parameter)); } private void ExecuteNavigateType(object parameter) { this.NavigationService.Navigate(); } |
Note that you can also navigate to the same view model but consumed by different views using the NavigationParameter as shown above.
List Navigation (Push Navigation)
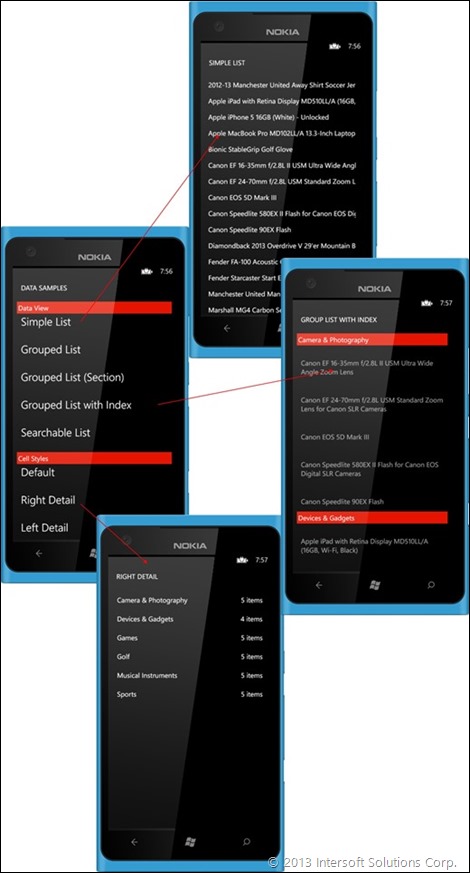
Crosslight navigation service enables you to perform navigation from within the view model. You can navigate to a view model by providing the type, or a known identifier.
The navigation view model looks as simple as this:
|
1 2 3 4 5 6 7 8 9 10 11 12 13 14 15 16 17 18 19 20 21 22 23 24 25 26 |
public class NavigationViewModel : ListViewModelBase { public NavigationViewModel() { IApplicationContext context = this.GetService().GetContext(); List items = new List(); items.Add(new NavigationItem("Simple List", "Data View", typeof(SimpleListViewModel))); items.Add(new NavigationItem("Grouped List", "Data View", typeof(GroupListViewModel))); items.Add(new NavigationItem("Grouped List (Section)", "Data View", new NavigationTarget(typeof(GroupListViewModel), "GroupStyle"))); items.Add(new NavigationItem("Grouped List with Index", "Data View", new NavigationTarget(typeof(GroupListViewModel), "GroupIndex"))); items.Add(new NavigationItem("Searchable List", "Data View", typeof(FilterListViewModel))); ... this.SourceItems = items; this.RefreshGroupItems(); } public override void RefreshGroupItems() { if (this.Items != null) this.GroupItems = this.Items.GroupBy(o => o.Group).Select(o => new GroupItem(o)).ToList(); } } |
Modal Navigation
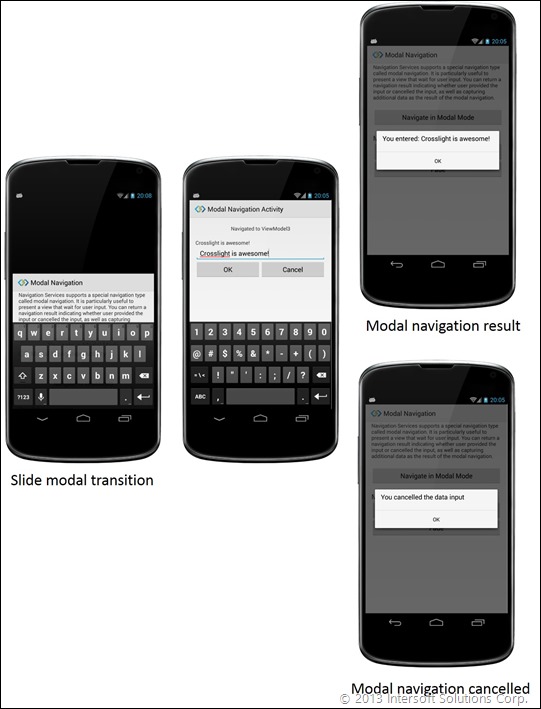
The integrated navigation service supports a special navigation type called as modal navigation. It is particularly useful to present a view that waits for user input; you can return a navigation result indicating whether the user provided the input or cancelled the input, as well as capturing additional data as the result of the modal navigation.
To execute a modal navigation, in the view model, we can specify as follows:
|
1 2 3 4 5 6 7 8 9 10 11 12 13 14 15 16 17 18 19 |
private void ExecuteNavigateModal(object parameter) { NavigationParameter navigationParameter = new NavigationParameter() { NavigationMode = NavigationMode.Modal }; ... this.NavigationService.Navigate( new NavigationTarget(typeof(ViewModel3), navigationParameter), (result) => { if (result.Action == NavigationResultAction.Cancel) this.MessagePresenter.Show("You cancelled the data input"); else this.MessagePresenter.Show("You entered: " + result.Data.ToString()); }); } |
Notice that after modal navigation is executed, you can handle the result of the modal navigation through action callbacks.
Nested Modal Navigation
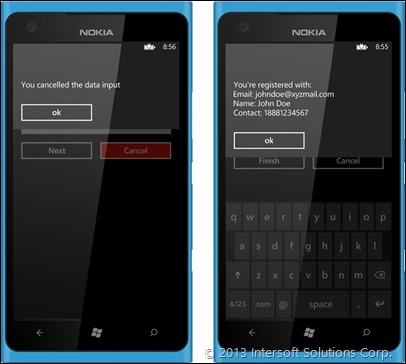
In addition to basic modal navigation, the Crosslight navigation service also supports advanced modal navigation that allows you to perform navigation within the modal view context. Called Nested Modal Navigation, this feature is particularly useful when you need to capture numerous data input that are split to multiple views (wizard-like).
The navigation service manages the navigation stack made during the modal session. When the Close method is called, it automatically discards the entire modal navigation stack, and return to the initiator view.
It is quite simple to execute a nested modal navigation:
|
1 2 3 4 5 6 7 8 9 10 11 12 13 14 15 16 17 18 |
private void ExecuteNavigateModal(object parameter) { NavigationParameter navigationParameter = new NavigationParameter(new RegistrationData()) { NavigationMode = NavigationMode.Modal, EnsureNavigationContext = true }; this.NavigationService.Navigate( new NavigationTarget(typeof(NestedStep1ViewModel), navigationParameter), (result) => { if (result.Action == NavigationResultAction.Cancel) this.MessagePresenter.Show("You cancelled the data input"); else this.ShowRegistrationData(result.Data as RegistrationData); }); } |
Similar to the previous modal navigation, you can handle the result of the nested modal navigation through action callbacks through the nested modal view initiator.
Master-Detail Navigation
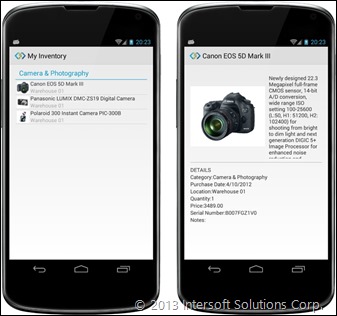
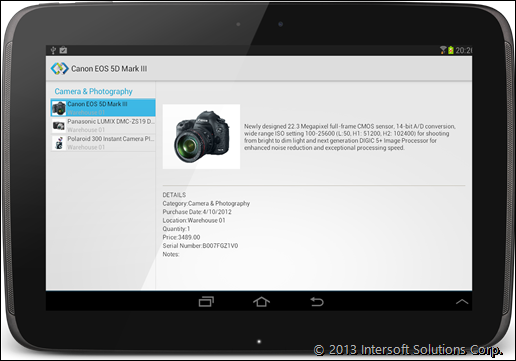
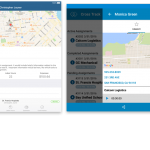
The Crosslight navigation service supports master-detail navigation, both when deployed to a phone device or a tablet device. On a phone device, the navigation would be interpreted as push navigation while on a tablet it would be treated differently based on the targeted platform.
On phone, it will look like this:
While on tablet:
For iOS and Android, you would need a binding provider that specifies the detail view model when the item is tapped.
|
1 2 3 4 5 6 7 8 9 10 11 12 13 14 15 16 17 18 19 20 21 |
public class ListNavigationBindingProvider : BindingProvider { #region Constructors public ListNavigationBindingProvider() { ItemBindingDescription itemBinding = new ItemBindingDescription() { DisplayMemberPath = "Name", DetailMemberPath = "Location", ImageMemberPath = "ThumbnailImage" }; this.AddBinding("TableView", BindableProperties.ItemsSourceProperty, "Items"); this.AddBinding("TableView", BindableProperties.ItemTemplateBindingProperty, itemBinding, true); this.AddBinding("TableView", BindableProperties.SelectedItemProperty, "SelectedItem", BindingMode.TwoWay); this.AddBinding("TableView", BindableProperties.DetailNavigationTargetProperty, new NavigationTarget(typeof(ItemDetailViewModel)), true); } #endregion } |
Tab Navigation
The navigation service also supports tab navigation using selected index. By inheriting a special view model called MultiPageViewModelBase, you can perform navigation setting the selected index of the navigation items. You can also send parameters and custom objects during tab navigation.
The TabViewModel that enables tab navigation:
|
1 2 3 4 5 6 7 8 9 10 11 12 13 14 15 |
public class TabViewModel : MultiPageViewModelBase { #region Constructors public TabViewModel() { var items = new List(); items.Add(new NavigationItem("Simple Page", typeof(SimpleViewModel)) { Image = "first.png" }); items.Add(new NavigationItem("About", typeof(AboutNavigationViewModel)) { Image = "second.png" }); this.Items = items.ToArray(); } #endregion } |
Powerful Data-Binding Features
Crosslight was designed with the powerful MVVM design pattern in mind. The MVVM design pattern itself is almost always associated with data-binding concept. .NET developers targeting Silverlight and WPF will be at home with the concept. However, this post will not cover the concepts of data-binding itself, but more on how Crosslight leverages this concept to the mobile development world, which were only available to platforms such as Silverlight and WPF. If you would like to learn more about data-binding concept, Microsoft has detailed a very good article here that covers the topic in-depth.
Property-to-Property Binding
Crosslight data-binding framework supports the very basic property-to-property data binding, enabling you to bind a property to another property using various information contained in BindingDescription using a BindingProvider class.
|
1 2 3 4 5 6 7 8 9 10 11 12 13 |
public class BindingModeBindingProvider : BindingProvider { public BindingModeBindingProvider() { this.AddBinding("Label1", BindableProperties.TextProperty, "Text", BindingMode.OneTime); this.AddBinding("Label2", BindableProperties.TextProperty, "Text", BindingMode.OneWay); this.AddBinding("TextField1", BindableProperties.TextProperty, "Text", BindingMode.TwoWay); this.AddBinding("Label3", BindableProperties.TextProperty, "Amount", BindingMode.OneWay); this.AddBinding("Slider1", BindableProperties.ValueProperty, "Amount", BindingMode.TwoWay); this.AddBinding("TextField2", BindableProperties.TextProperty, "Amount", BindingMode.TwoWay); this.AddBinding("Stepper1", BindableProperties.ValueProperty, "Amount", BindingMode.TwoWay); } } |
Universal Data Management
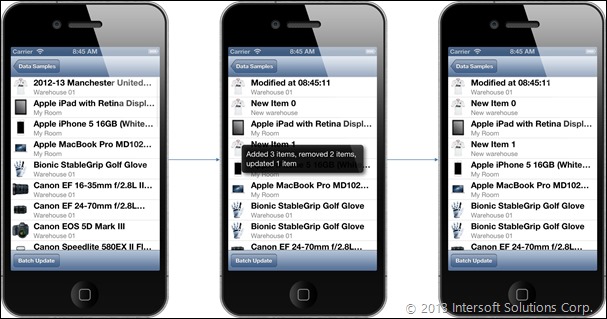
Crosslight data binding framework supports automatic UI updates when bound to a collection. This allows for easier data management as well as saving you the trouble of updating the UI when the underlying data model changes. Consider the following view model:
|
1 2 3 4 5 6 7 8 9 10 11 12 13 14 15 16 17 18 19 20 21 22 23 24 |
private void ExecuteBatchUpdate(object parameter) { // Begin updating this.IsBatchUpdating = true; // Perform multiple add and remove simultaneously var items = this.Items.ToObservable(); var updatedItem = items.ElementAt(0); updatedItem.Name = "Modified at " + DateTime.Now.ToString("hh:mm:ss"); this.OnDataChanged(updatedItem); items.Insert(1, new Item {Name = "New Item " + this.NewIndex++, Location = "New warehouse", ThumbnailImage = updatedItem.ThumbnailImage}); items.Insert(3, new Item {Name = "New Item " + this.NewIndex++, Location = "New warehouse", ThumbnailImage = updatedItem.ThumbnailImage}); items.Insert(6, new Item {Name = "New Item " + this.NewIndex++, Location = "New warehouse", ThumbnailImage = updatedItem.ThumbnailImage}); items.Remove(items.ElementAt(5)); items.Remove(items.ElementAt(7)); this.ToastPresenter.Show("Added 3 items, removed 2 items, updated 1 item", null, null, ToastDisplayDuration.Immediate, ToastGravity.Center); // End updating this.IsBatchUpdating = false; } |
After you have finished inserting items to the model, the view updates accordingly.
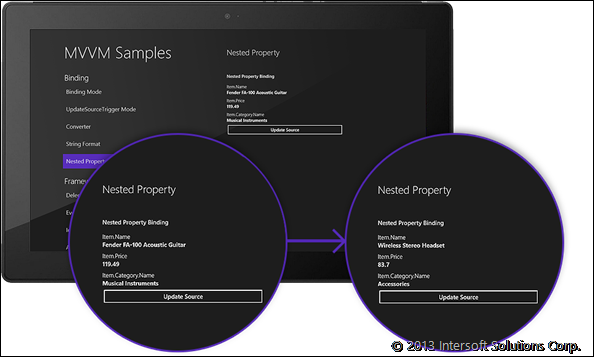
Binding to Nested Property
Aside from binding to a top-level property, you can also bind to a nested property.
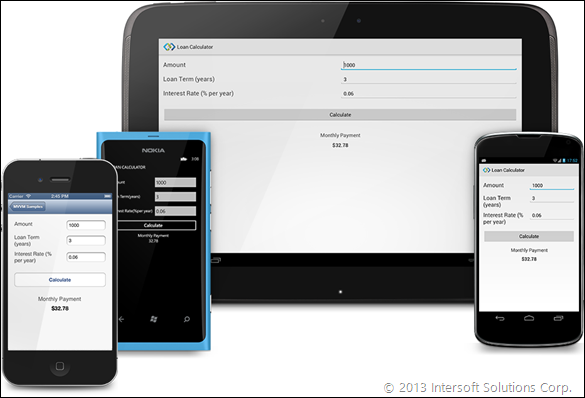
Case 1: Loan Calculator
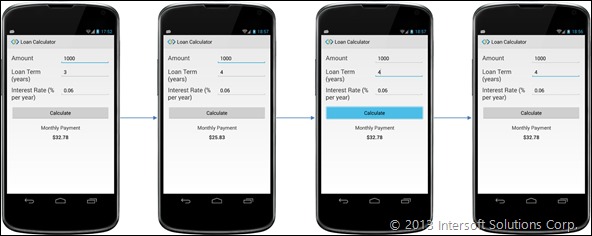
A simple app that can be made using the data-binding framework is the loan calculator where you would input the amount of loan, the loan term in years, and the interest rate per year.
Each of the textboxes and the button is bound using a BindingProvider.
|
1 2 3 4 5 6 7 8 9 10 11 |
public class LoanCalculatorBindingProvider : BindingProvider { public LoanCalculatorBindingProvider() { this.AddBinding("AmountTextField", BindableProperties.TextProperty, "Amount", BindingMode.TwoWay); this.AddBinding("LoanTermTextField", BindableProperties.TextProperty, "LoanTerm", BindingMode.TwoWay); this.AddBinding("InterestRateTextField", BindableProperties.TextProperty, "InterestRate", BindingMode.TwoWay); this.AddBinding("MonthlyPaymentLabel", BindableProperties.TextProperty, new BindingDescription("MonthlyPayment") { StringFormat = "{0:c}" }); this.AddBinding("CalculateButton", BindableProperties.CommandProperty, "CalculateCommand"); } } |
After inputting the specified amount, loan term, and interest rate, and hit calculate, it calculates the monthly payment by calling the command specified in the view model, as follows:
|
1 2 3 4 |
private decimal GetCalculateMontlyPayment() { return decimal.Round((this.Amount + (this.Amount * this.InterestRate * (decimal)this.LoanTerm)) / ((decimal)this.LoanTerm * (decimal)12),2); } |
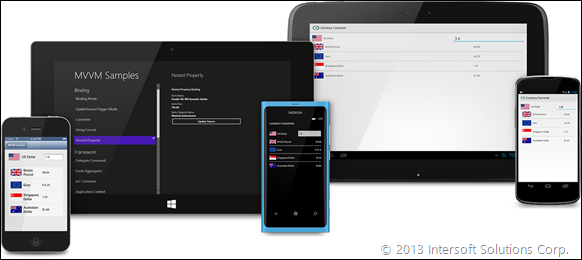
Case 2: Currency Converter
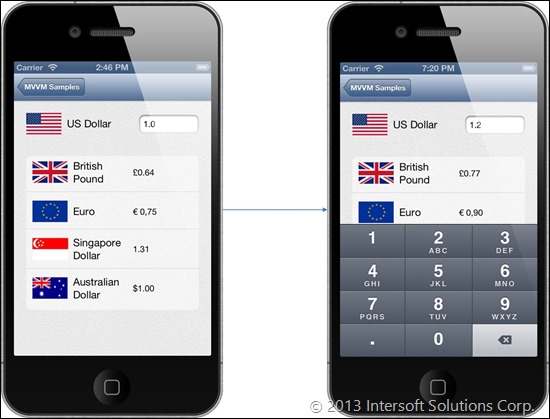
Another simple example would be to make an offline currency converter. This example demonstrates Crosslight support for binding with full converter and UpdateSourceTrigger support.
Full Converter Support
Just like the native binding found in Silverlight and WPF platforms, Crosslight also supports binding with converter, complete with converter parameter and converter culture.
UpdateSourceTrigger Support
Intersoft Crosslight provides four predefined UpdateSourceTrigger values, namely Default, Explicit, LostFocus, and PropertyChanged. By default, the update process to the bound property will be done after lost focus event is triggered. The following code shows how you can use the two-way BindingMode as well as setting the UpdateSourceTrigger to PropertyChanged.
|
1 2 3 4 5 6 7 8 9 10 11 12 13 |
public class CurrencyConverterBindingProvider : BindingProvider { public CurrencyConverterBindingProvider() { CurrencyFormatConverter converter = new CurrencyFormatConverter(); this.AddBinding("BaseCurrencyTextField", BindableProperties.TextProperty, new BindingDescription("USCurrency", BindingMode.TwoWay, UpdateSourceTrigger.PropertyChanged)); this.AddBinding("BritishCurrencyTextField", BindableProperties.TextProperty, new BindingDescription("UKCurrency") { Converter = converter, ConverterParameter = "{0:c}", ConverterCulture = new CultureInfo("en-gb") }); this.AddBinding("EuroCurrencyTextField", BindableProperties.TextProperty, new BindingDescription("EuroCurrency") { Converter = converter, ConverterParameter = "{0:c}", ConverterCulture = new CultureInfo("nl-NL") }); this.AddBinding("SGCurrencyTextField", BindableProperties.TextProperty, new BindingDescription("SGCurrency") { Converter = converter, ConverterParameter = "{0:c}", ConverterCulture = new CultureInfo("zh-sg") }); this.AddBinding("AUCurrencyTextField", BindableProperties.TextProperty, new BindingDescription("AUCurrency") { Converter = converter, ConverterParameter = "{0:c}", ConverterCulture = new CultureInfo("en-au") }); } } |
As a result, the respective currencies will be converted in real time when the text is changed.
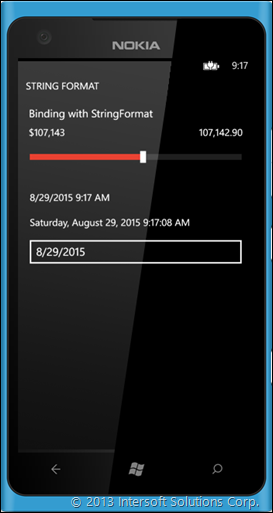
StringFormat Support
Crosslight BindingProvider also supports binding with StringFormat support.
|
1 2 3 4 5 6 7 8 9 10 11 12 13 |
public class StringFormatBindingProvider : BindingProvider { public StringFormatBindingProvider() { this.AddBinding("Label1", BindableProperties.TextProperty, new BindingDescription("Amount", BindingMode.OneWay) { StringFormat = "{0:c0}" }); this.AddBinding("Label2", BindableProperties.TextProperty, new BindingDescription("Amount", BindingMode.OneWay) { StringFormat = "{0:###,###.00}" }); this.AddBinding("Label3", BindableProperties.TextProperty, new BindingDescription("Date", BindingMode.OneWay) { StringFormat = "{0:g}" }); this.AddBinding("Label4", BindableProperties.TextProperty, new BindingDescription("Date", BindingMode.OneWay) { StringFormat = "{0:F}" }); this.AddBinding("Slider1", BindableProperties.ValueProperty, "Amount", BindingMode.TwoWay); this.AddBinding("DatePicker1", BindableProperties.ValueProperty, "Date", BindingMode.TwoWay); } } |
Wrap-up
Navigation and data-binding are just some of the features Crosslight introduced to the mobile development world. It is important to note while all these features are shown platform specific, they work consistently across multiple platforms. The diverse pictures shown in this blog post is to give you an overview about the features described earlier were not platform-specific; they can be applied cross-platform. Some of the Crosslight API outlined in the code snippets are not explained in detail here; they will be covered comprehensively in our product documentation upon release. You might wonder, while these features sound too good to be true, in fact, they really are. These magical features will be available as soon as we hit our 2013 R1 milestone, which is going to be released very soon in early September.
Regards,
Nicholas Lie


Can you provide a listing of all the components that Intersoft is going to have for Mobile development? And , are these components work the same on all three platforms?
Secondly, are you going to provide a global theme that same app “can” look the same on all three platforms?
Thanks!
..Ben
Hi Ben,
Thank you for your interest in Mobile Studio. Yes, we are going to provide templates that will work consistently across multiple platforms. However, it is important to note that since you will be building apps on a native level, the UI experience that Mobile Studio has provided will conform to each platform UI design guidelines. We are pleased to tell you that you can get a copy of Mobile Studio immediately at http://www.intersoftpt.com/RequestTrial. For more information on what Mobile Studio has to offer, check out: http://www.intersoftpt.com/Studio/Mobile. Have a great day!
Cheers,
Nicholas
Hi Nic;
I wasn’t asking if you offer templates. I was asking to know what components/controls does Intersoft offer to build the UI.
Just like you offer controls here http://intersoftpt.com/ClientUI/Controls , for example, I need to see a listing for Mobile development.
Thanks!
Hi Ben,
Yes, we do provide 80+ MVVM-enabled controls that spans over 4 platforms : iOS, Android, Windows Phone, and WinRT. The covered editors comprises of MVVM-enabled controls such as date pickers, buttons, text fields, labels, time pickers, and you can even add your own custom controls. For more details, see here: http://www.intersoftpt.com/Crosslight. The built-in editors for forms are declared using metadata definition; which be translated by the framework automatically. Unlike previous experience in using custom controls, we no longer explicitly declare the use of controls in cross-platform mobile development. This is an integrated feature of Crosslight form builder.
Cheers,
Nicholas Lie
*Unlike previous experience in using custom controls, we no longer explicitly declare the use of controls in cross-platform mobile development. This is an integrated feature of Crosslight form builder.*
Ah, that was exactly why I was asking that question, how you managed to have all the controls for four platform.
Could you please make a video how a control is used as “metadata” during development, let’s say iOS and Android and how it looks at runtime?
I’m also interested in what Ben said.
And, would also like to know more about Client UI, mostly WPF not Silverlight (which I care less since the announcement of the cease of support by MS).
Thanks,
Dave
Hi David,
Yes, we will continue to support and enhance ClientUI for both Silverlight and WPF platforms. In fact, we have just released new reporting controls. You can find more about it here: http://www.intersoftpt.com/Studio/WPF and http://www.intersoftpt.com/Studio/Silverlight.
Cheers,
Nicholas