ClientUI 5 SP1 Adds Support for LightSwitch
By top requests, we’ve added full support for LightSwitch Beta 2 in the recently released ClientUI 5 service pack 1. At a quick glance, LightSwitch is a Microsoft tool for “developers of all skill levels” who want to build simple business applications in a short time without having to understand most of the underlying technologies. You can find out more about LightSwitch here.
LightSwitch generates applications based on the presentation-logic-data storage architecture. I’m not a huge fan of application generator though, particularly the one that generates the UI and layout part of the application. IMHO, user interface and user experience aspects of an application should be authentic and customized to reflect the brand of the associated business or the product. Of course, application generators can be useful in certain scenarios, for example, when you need to quickly build internal applications for administrative use.
Some have argued that LightSwitch is amateurish reminding of the old Access, but others consider it appropriate for small businesses with simple needs, being able to create their own CRUD applications without having to hire programmers for that. Nevertheless, we have decided to add full support for LightSwitch as part of our commitment in delivering the best tooling support for Visual Studio development. Click here to download ClientUI 5 service pack 1 with LightSwitch support.
Using ClientUI Controls in LightSwitch
In this blog post, I’d like to share how easy and simple it is to consume ClientUI controls in your LightSwitch application – thanks to the MVVM-ready control architecture. Starting from beta 2, LightSwitch allows nearly all layout and predefined controls to be replaced with custom controls. This includes the list, data grid, and form controls such as text box and date time picker.
In this post, I will show how to to replace the default date and time picker with ClientUI’s UXDateTimePicker to provide more appealing date and time selection. Assuming that you already have a sample LightSwitch project ready, please open the screen designer for a particular form. In my sample, I used the Employee List Detail which was modeled from our all-time favorite Northwind database.
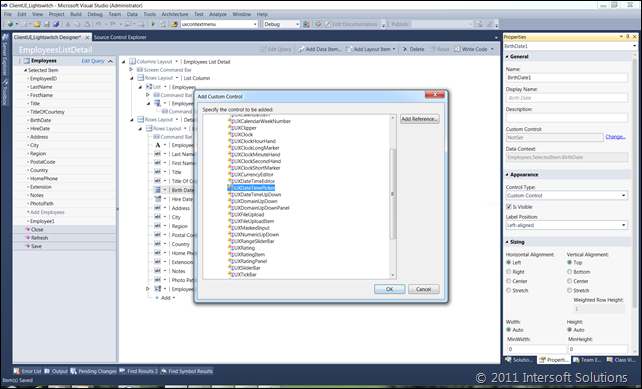
Once the designer is presented, select one of the date time fields. The “Hire Date” seems to make the most sense here since it utilizes both the date and time elements. In the property window, change Control Type to Custom Control, then click the Change link to specify the custom control type. In the next second, you will be prompted with a dialog box asking you to select the type of the control to use.
Expand Intersoft.Client.UI.Aqua.UXInput assembly and select UXDateTimePicker such as shown in the following shot.
If the desired assembly is not listed, you can browse the assembly by clicking the Add References button and add the desired assembly. Certainly, only compatible Silverlight controls will be accepted.
Now that you’ve specified the custom control, the final step is writing code to bind the data value to the control. I’m initially expecting LightSwitch to have automatic capability in doing the binding, but unfortunately it’s not. You also cannot access the custom control’s properties directly in the designer, which is one of shortcoming in the LightSwitch that I hope can be addressed in the final version.
The following code shows how to implement data binding to the custom control and customize the control’s properties via code.
|
1 2 3 4 5 6 7 8 9 10 11 12 13 14 15 16 17 18 19 20 21 22 23 24 |
namespace LightSwitchApplication { public partial class EmployeesListDetail { partial void EmployeesListDetail_Created() { // get the reference to the UXDateTimePicker var datePicker = this.FindControl("HireDate1"); // set the value binding to the UXDateTimePicker's Value property. datePicker.SetBinding(UXDateTimePicker.ValueProperty, "Value"); datePicker.ControlAvailable += new EventHandler<ControlAvailableEventArgs>(DatePicker_ControlAvailable); } private void DatePicker_ControlAvailable(object sender, ControlAvailableEventArgs e) { UXDateTimePicker datePicker = e.Control as UXDateTimePicker; datePicker.EditMask = "MM/dd/yyyy hh:mm tt"; datePicker.UseEditMaskAsDisplayMask = true; } } } |
That’s it, we’re all set! Simply press F5 to run the project to the browser. The build process took much longer than normal Silverlight projects. You might need to wait for several seconds before you can see the browser window popped up.
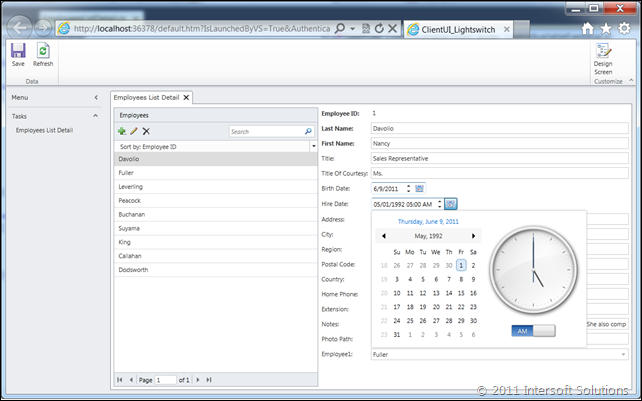
The following screenshot shows the UXDateTimePicker in action. Click on the Hire Date’s picker to see the calendar with an elegant analogue clock. Notice that the date is correctly selected, as well as the time. All good!
Want to give it a try quickly? Download the sample here, extract and run the project. Note that you will need Northwind database installed in your local SQL server.
Licensing ClientUI in LightSwitch Application
When Microsoft announced the second beta of LightSwitch three months ago, our support team has been constantly bombarded with licensing questions in LightSwitch. How do you supposed to license ClientUI in such black-boxed application domain? I will unveil it next, read on.
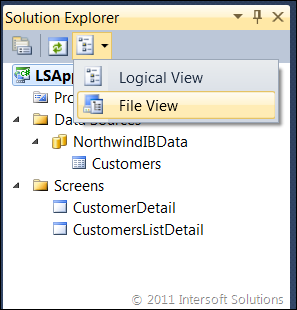
By default, LightSwitch application shows the logical view in the Solutions Explorer. This allows developers to quickly skim on the information that matters to them – in this case, the data source and the screens – instead of a huge stack of projects and generated files. Fortunately, LightSwitch still allows you to view the solution in File perspective. This can be done through the small button in the right most of the Solution Explorer’s toolbar, please refer to the following shot.
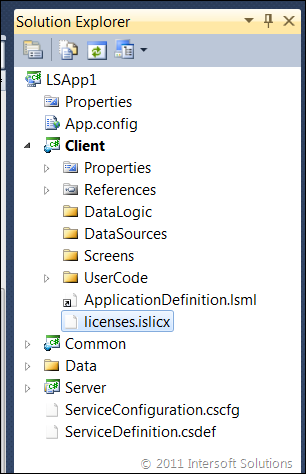
The file view is required for the ClientUI’s licensing to work. As you may have aware, to license ClientUI in a Silverlight or WPF app, you need to embed the runtime license file called licenses.islicx to the root of the main project.
Once you switched to the File view, you will be presented with four projects in the Solution Explorer. The correct project to choose for the ClientUI licensing is the Client project. You can then follow the normal licensing procedure afterward, such as adding the license file and then set its Build Action to Embedded Resource. See the following shot.
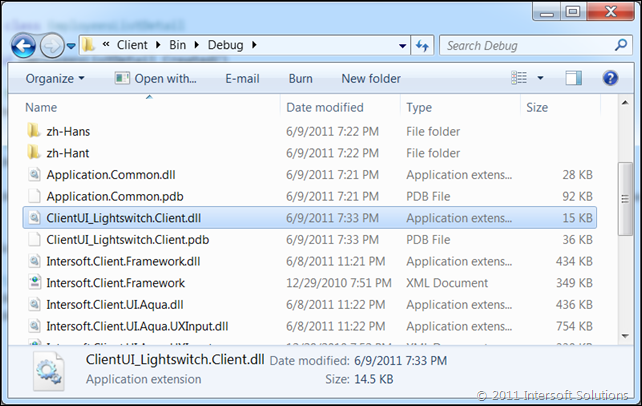
And one more thing. LightSwitch generates dozens of assemblies in the output folder which contains the application building block and common runtime used in the LightSwitch application. Make no mistakes, the main assembly that you should select for the licensing is the one ended up with .Client.dll, for example, ClientUI_Lightswitch.Client.dll for project with name ClientUI_Lightswitch.
To make it clear, I included the screenshot below that shows the exact location of the Client assembly required for the ClientUI licensing.
I hope this blog post gives you a quick start on building ClientUI-powered LightSwitch application. Please post your feedback, thoughts or questions in the comment box below.
Best,
Jimmy
I’ll try it, looks good.