Using WebListBox in Line-of-business Scenarios
WebListBox is one of the controls included in WebEssentials collection. To learn more about WebEssentials, you can read this post or visit WebEssentials product information here.
As explained in the previous post, WebListBox can be used as input control and navigation control. In this post, I will discuss two of the most common line-of-business (LoB) scenarios where WebListBox can be useful.
Using WebListBox as Input Control
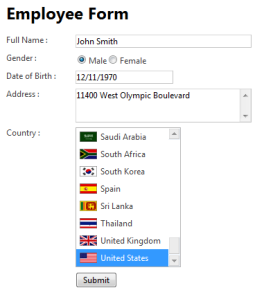
Let’s say you have an employee form where employees can choose their origin country in a list box. Of course, you can always use .NET ListBox to list all of the country options in the employee form, such as shown in the following screenshot.
With WebListBox, you can display the countries in more compelling presentation. For instance, it would be nice to have the country’s flag image in addition to the text.
Let’s start with the data binding and see how easy it is to bind an XML data to a WebListBox. Consider you have a Country data in XML, such as shown below.
|
1 2 3 4 5 6 7 |
<Countries> . . . <Country Id="49" Name="United Kingdom" Image="UnitedKingdom.png"> </Country> <Country Id="50" Name="United States" Image="UnitedStates.png"> </Country> </Countries> |
Similar to .NET ListBox, you can declaratively bind an XML data source to WebListBox using DataSourceID property. You can also specify the data member properties such as text and value data member. Unlike .NET ListBox, WebListBox provides more data member properties, such as NameFieldDataMember, TextFieldDataMember, ValueFieldDataMember, and ImageFieldDataMember. You can set these properties to the related attribute member in the XML data, for example, set TextFieldDataMember property to Name which will bind the text of each item in WebListBox to the Name attribute in the XML data. You can also set the ImageFieldFormatString property to specify the image folder path of the image field, e.g.: ./images/{0}.
The following code shows how to bind WebListBox to XMLDataSource and use the provided data member properties such as ImageFieldFormatString for easy data binding.
|
1 2 3 4 5 6 7 |
<ISWebEssentials:WebListBox ID="wlbCountry" runat="server" DataSourceID="XmlDataSource1" DefaultStyleMode="Minimalist" Height="200px" ImageFieldDataMember="Image" ImageFieldFormatString="./images/{0}" NameFieldDataMember="Id" TextFieldDataMember="Name" ValueFieldDataMember="Id" Width="150px"> <LayoutSettings DisplayMode="TextAndImage" ImageSize="25, 15" ItemHeight="25" ScrollMode="ScrollBar" /> </ISWebEssentials:WebListBox> |
To show the text and image in WebListBox’s item, you can set DisplayMode property to TextAndImage. You can also specify the size of the image using ImageSize property. The following screenshot shows the result of the above WebListBox configuration. Compared to .NET ListBox in the earlier screenshot, the following employee form using WebListBox looks more intuitive and compelling.
Note that you can navigate through the country options using up and down arrow keys when the EnableKeyboardSupport property of the WebListBox is enabled.
Using WebListBox as Navigation Control
In addition to using WebListBox as input control, you can also use WebListBox as navigation control since it has been enhanced to include navigation functionality. When WebListBox is used as navigation control and users select an item in WebListBox, he will be redirected to a specific URL based on the item’s TargetURL property value.
In this post, I will show you how to use WebListBox as a navigation control in a travel agent website where users can browse and navigate through a list of hotels.
Consider the following XML data as the data source. It contains the name, image, and website URL of each hotel. You can bind this data to WebListBox using the data binding related properties, like described in the above Employee Form scenario.
|
1 2 3 4 5 6 7 |
<Hotels> <Hotel Id="1" Name="Oberoi Vanyavilas" Image="oberoi-vanyavilas.jpg" URL="http://www.oberoihotels.com/"> </Hotel> <Hotel Id="2" Name="Triple Creek Ranch" Image="triple-creek-ss.jpg" URL="http://www.triplecreekranch.com/"> </Hotel> . . . </Hotels> |
Besides the NameFieldDataMember, TextFieldDataMember, ValueFieldDataMember, and ImageFieldDataMember properties, you can also specify the TargetURLFieldDataMember property to indicate the field data member used as target URL of each item.
In the above XML data structure, the URL attribute specifies the website URL for each hotel. You can set the URL as the value of TargetURLFieldDataMember property. In addition, you also need to specify the TargetWindow property. When users click on an item in WebListBox, the target URL of the item will be opened in the target window, which is specified in TargetWindow property. The complete WebListBox configuration can be seen in the following code.
|
1 2 3 4 5 6 7 |
<ISWebEssentials:WebListBox ID="WebListBox1" runat="server" Height="99%" Width="100px" DefaultStyleMode="Natural" EnableKeyboardSupport="true" DataSourceID="XmlDataSource1" TextFieldDataMember="Name" ImageFieldDataMember="Image" ImageFieldFormatString="./images/{0}" ValueFieldDataMember="Id" NameFieldDataMember="Id" TargetURLFieldDataMember="URL" SelectedIndex="0"> <LayoutSettings ItemHeight="80" ScrollMode="Scroller" DisplayActiveItemIndicator="true" TargetWindow="paneContent" DisplayMode="TextAndImage" ImagePosition="AboveText" ItemAlignment="Center" /> </ISWebEssentials:WebListBox> |
To adjust the WebListBox layout with its navigation functionality, you can set several properties in LayoutSettings group, such as DisplayMode, ImagePosition, ItemAlignment, ItemHeight, and ScrollMode property.
WebListBox also includes a unique feature that shows a callout-style indicator to mark the active item, which is particularly useful in navigation scenario. To enable this feature, you set the DisplayActiveItemIndicator property of the WebListBox to True.
The following screenshot illustrates the result of the WebListBox as described in the above code.
When users select one of the hotels in the left pane, the navigation process will be invoked and the related URL will be displayed in the right pane. You don’t need to add any script or server side code, because the navigation process is handled by WebListBox automatically.
Conclusion
In this post, you have learned how to implement two of the most common LoB scenarios using WebListBox. The first is to use WebListBox as input control, and the other as navigation control. You can download the samples here, or click here to play with WebListBox samples from online demos.
For more information about WebListBox and its features, please visit WebListBox product page. If you have further questions or feedback, feel free to post them in Intersoft community forum.
Cheers,
Erika


Comments