ClientUI Part 7 – Unveiling Desktop, Window and Dock Experiences.
Earlier this month, we have released a public RC version of ClientUI 3 which includes all controls for Silverlight 3, Silverlight 4 and WPF 4. I trust you’ve got yourself a copy of the bits – if not, you can download and get started here. While we’re preparing for the final release, you can actually test drive the ClientUI RC bits in your projects. Many of the controls and templates that we shipped in the RC are already near RTM quality thus enables you to do quick prototyping or jump into development directly.
In this post, I’ll continue on the ClientUI series blog which is focused on many exciting visual goodies – something that your end users will definitely love to see and experience with. Now with the ClientUI RC bits in your hand, you can try many of the new features by yourself, or download the samples and run it in your development machine.
Toward A Better RIA Application Model
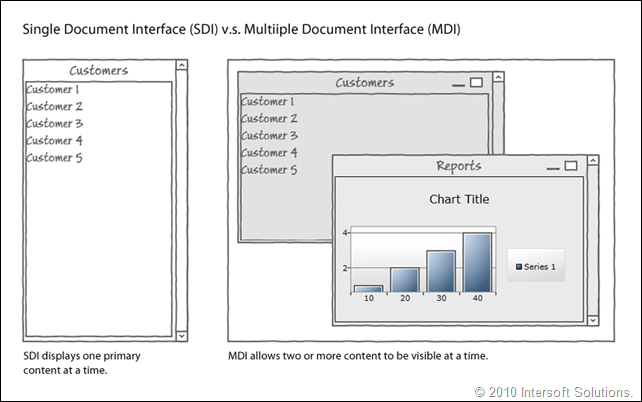
In my past blog series, I’ve introduced several key application scenarios that you can now build on a Silverlight platform – from a simple website navigation to a more advanced, journal-aware business application model. These application models are commonly called as single document interface (SDI), whereas users navigate to and interact with only one document (or content) at a time.
In simpler thought, you can also think of it as a single task-based interface. For an instance, navigating to a Customers page will show you a list of customers where you can view customer information, edit, delete or do actions related to it. Then, if you would like to see some Reports, you need to navigate to the Reports page which consequently leaving the Customers page. This kind of presentation pattern describes a single document interface.
While SDI pattern suits most of simpler applications, a more complex one such as composite application can use more innovative presentation to overcome the single-task limitation, which at the same time enhances user experiences and productivity. One of the most popular presentation patterns for composite applications that made possible today is the multiple document interface (MDI) pattern.
The MDI is exactly the presentation pattern that we want to bring along in this ClientUI release which we hope to empower the next-generation RIAs with more compelling user experiences that revolutionize the way people interact with information. Contrary to the SDI, the MDI pattern allows multiple documents to be shown at the same time, such as showing Contacts and Reports in either stacked or side-by-side. That said, MDI pattern is widely adopted in most graphical operating system today, such as Windows, Mac OS, Linux and more.
The following illustration compares the SDI and MDI presentation pattern.
The Desktop and Window Experiences
It’s undeniable that technical difficulties and architecture complexity are among the aspects that hold back application developers and UX designers to employ MDI presentation in their composite RIA applications. That’s not to mention cross-browser compatibility, usability and consistency, and other details. To that end, we’ve built a set of tools from the ground-up which enable developers to rapidly build rich composite applications using MDI pattern. I’m excited to introduce our next-generation UXDesktop and UXWindow line-ups.
The UXDesktop and UXWindow are two key components of MDI presentation pattern. Specifically designed to meet the strict platform-standards in usability and experiences, UXWindow delivers consistent and reliable results regardless of browsers or platforms.
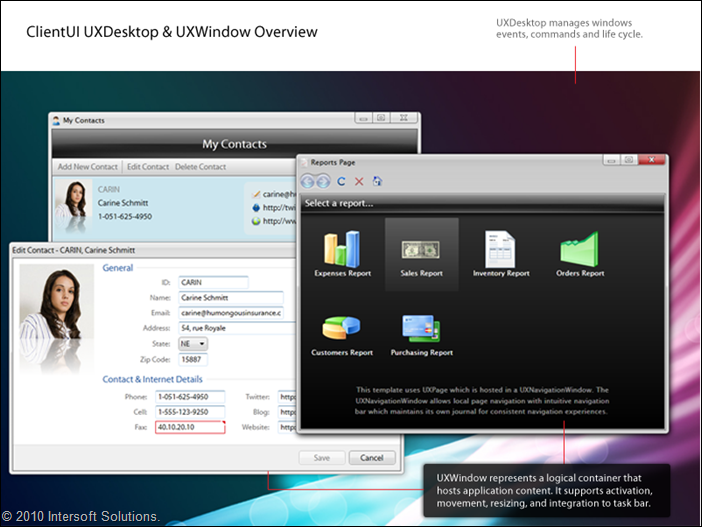
The UXDesktop manages the life cycle of all UXWindow instances that it hosted, this includes the window positioning arrangement, the window state management, window events and command management, while the UXWindow represents a logical container that supports fundamental MDI features such as ability to activate, deactivate, minimize, maximize, restore, close, move, resize and more.
The following screenshot shows the UXDesktop and UXWindow at a glance.
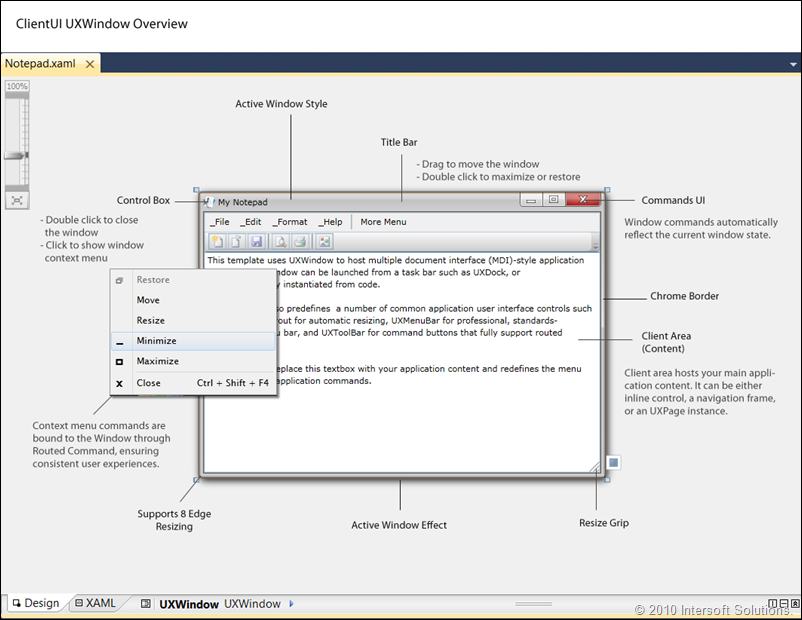
UXWindow is a full-featured windowing component which provides all the user interface elements needed in a window such as title, control box, option buttons, chrome border, content area and more. It gives you complete customization over its look and feel, so you can create any kind of commercial-class UIs to your liking.
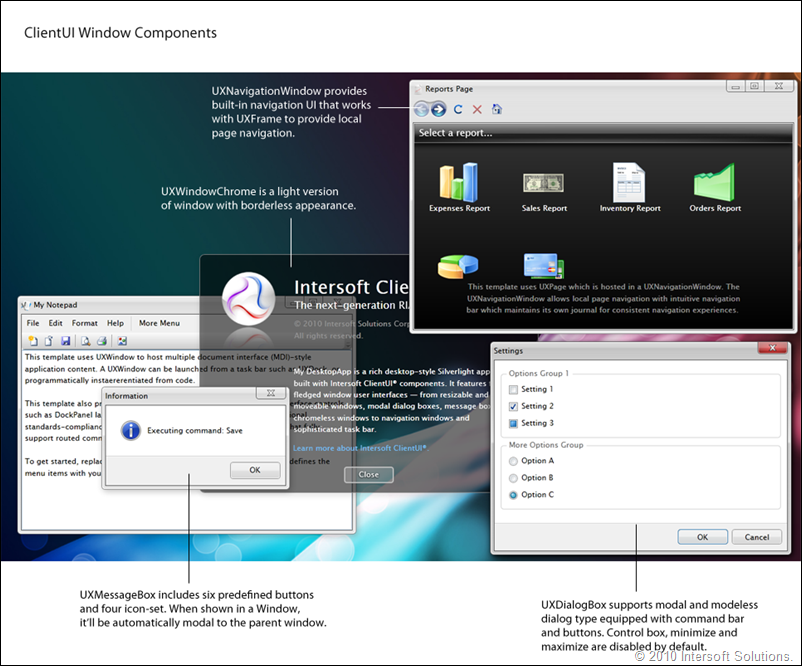
In this release, we also shipped various windowing components, such as UXWindowChrome, UXDialogBox, UXMessageBox and UXNavigationWindow. Using these components together with UXDesktop in your apps will breakthrough the existing RIA standards with full-fledged desktop experience that runs on the web.
Unlike simple window-look-alike approaches (such as the one in Silverlight’s ChildWindow), UXWindow fully complies to strict usability standards that I detailed in my fourth ClientUI series. One of the most critical aspects that a window must have is a solid focus management. So, if you switch from WindowA to WindowB, the logical focus will be set to the focusable element in the WindowB. Similarly, it should focus to the last element where the focus was left off upon switching to the previous window. Called focus scope and logical container, these are something Silverlight didn’t ship with, thus makes it nearly impossible for developers to implement such functionalities. On the other hand, we built all the required architectures from the scratch making many of these usability standards possible in the UXWindow and in the rest of our UI controls. And at the developer’s end, nothing else need to be done!
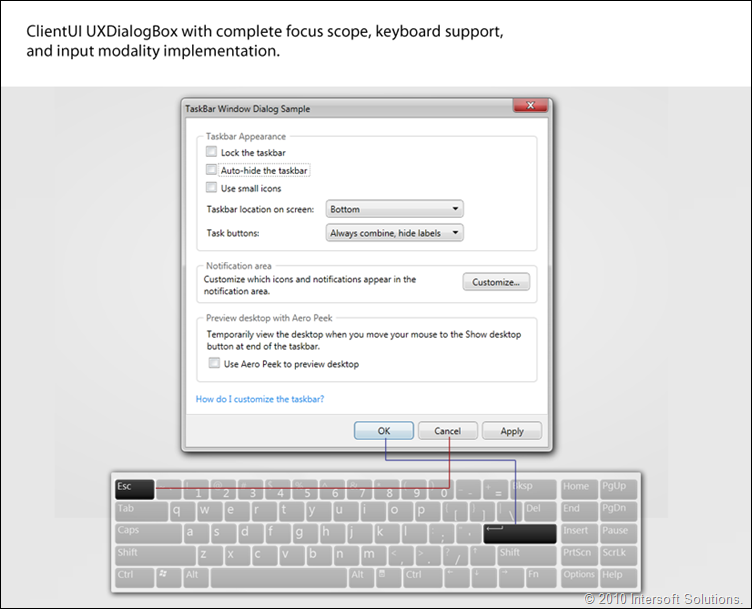
The image above shows a dialog box with command bar and buttons. The OK button is associated as default button, while Cancel as cancel button. When such buttons existed, dialog box automatically detects their behaviors and corresponds to the dialog result based on the clicked button. Consequently, the key state will also be automatically mapped to the default and cancel button. And again, nothing extra need to be done at developer’s end. All you need to do is simply dropping a command bar and some buttons, then set their properties.
The UXNavigationWindow is a special window type that allows you to create local navigation in the window-scoped container. You can think it as a minified, full-featured navigation frame that’s hosted in beautifully-dressed presentation. I’ll discuss this in another time as it has a lot of nice features while we better stick with our topics for now.
Meet UXDock – the Revolutionized Dock Experiences
In addition to many fundamental controls, this release also packed-in a new version of our flagship Dock control (previously known as WebFishEye). Called UXDock, the new dock control was rewritten from the ground up to comply with Silverlight development standards. For instance, UXDock is now an ItemsControl and it used ItemsPanel too. This means that you can now customize UXDock in the same way and manner as you would do on a standard Listbox control.
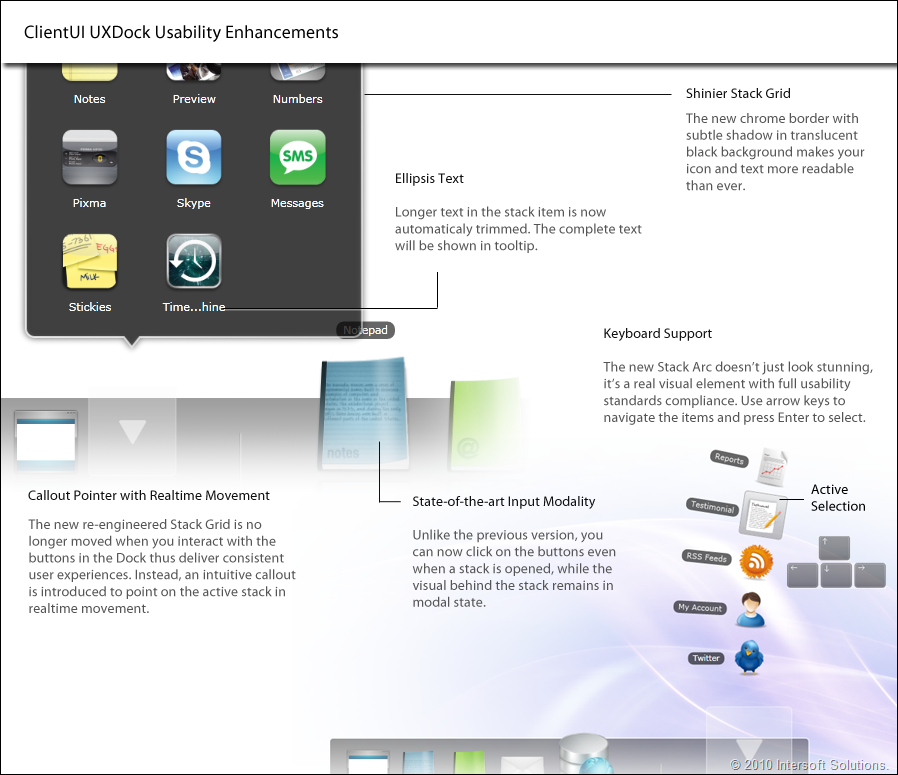
But, UXDock is not just about naming changes or architecture revamp. We re-engineered everything – from the zoom logic algorithm, stack layout mechanism to keyboard support and fine-tuned performance. In addition, we also managed to implement UXDock features to match the Apple User Experiences standards – many thanks to Apple folks who pointed out many of the usability issues in the previous version.
The following image illustrates some of the fundamental usability enhancements that we’ve addressed in this new version.
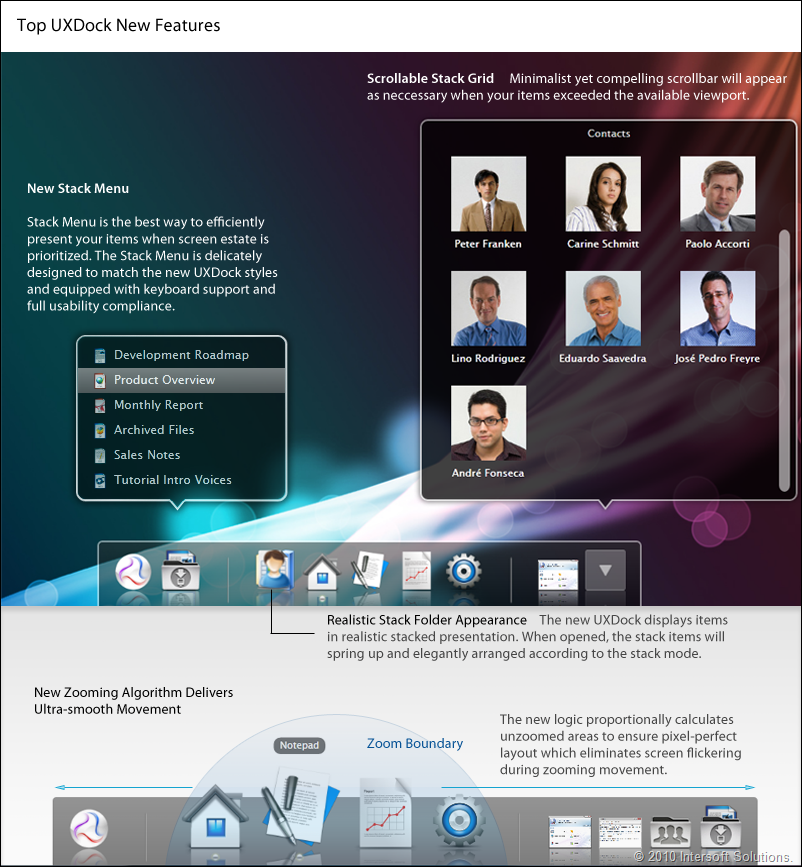
To give you more insights of what you can do with the new UXDock, here’s the top five new features that you’ll love to see:
- Ultra-smooth Zooming Algorithm
The most important user experiences aspect in a Dock control is the smoothness of its zooming process. To achieve the best result, every zoom point is calculated differently based on the zoom angle and where the mouse cursor enters from. Consequently, the new UXDock is twice faster than its predecessor, and you won’t spot any flickering movement again. - Scrollable Stack Grid
In real-world business apps, you don’t use UXDock to contain only a few contacts, documents, or items. That’s why our engineers revamped the Stack Grid to support scrollable mode so you can load any number of items you desire. - Comprehensive Drag-drop Support
Unlike the files-only drag-drop in Silverlight 4, ClientUI includes powerful drag-drop framework that supports arbitrary drag-drop between any visual elements. And better yet, our drag-drop framework is uniquely built around WPF semantics, so the same piece of Silverlight codes can continue to work without major changes in WPF project. The new UXDock is built on the top this drag-drop framework enabling you to add great interactivity to your RIAs – imagine dragging a contact from the stack onto the mail button to launch the Compose Email window, or reordering your favorite documents – all within the same interface. - Stack Folder Appearance with Reflection
The new UXDock now implements stack folder appearance in which items are stacked in the button area giving realistic and stunning items presentation. The stacked items aren’t just visual goodies, they are real visual elements that will spring out when the stack button is opened, and even can be navigated using keyboard in the open state. - New Stylish Stack Menu
Is the Stack Arc too fancy for your business app? Does the Stack Grid take too much of your screen real estate? Then turn to our new Stack Menu, a new mode that allows you to show stack items in efficient yet compelling menu style interface.
To get clearer picture on the top new features above, please refer to the following illustration.
There are still dozens of nice new features that I can’t detailed here. Rest assured they will be completely listed in our website and documentation when it becomes available in the next few weeks.
Last but not least, UXDock now also runs on WPF! You can now unleash your creativity and starts using UXDock experience whether you’re delivering RIA or desktop apps.
The Ultimate RIA Experiences Comes To Life
So, now that we have UXDesktop, UXWindow and UXDock unleashed, the only thing you would want next is to make them work nicely together – click on a button in the Dock to launch an application, click on the minimize button to bring down the window into the Dock, click a minimized window to spring it up back, or open a stack from the Dock and click a contact to see its profile in a stylish window.
To cover various application-specific requirements and UXDesktop integration, we’re introducing UXDesktopDock, an innovative UI control that includes everything existed in UXDock, plus desktop integration features and tweaked configuration for optimal use in business applications.
One of the most challenging requirements in the architecture design is how we want these components to work together without strongly-coupled type reference. This enables us to ship the UXDesktop and UXDock in different assemblies, while still enabling them to be integrated through loosely-coupled view integration. Furthermore, this architecture enables future extensibility when new type of Dock or Window is introduced while still having these components to work together without code changes.
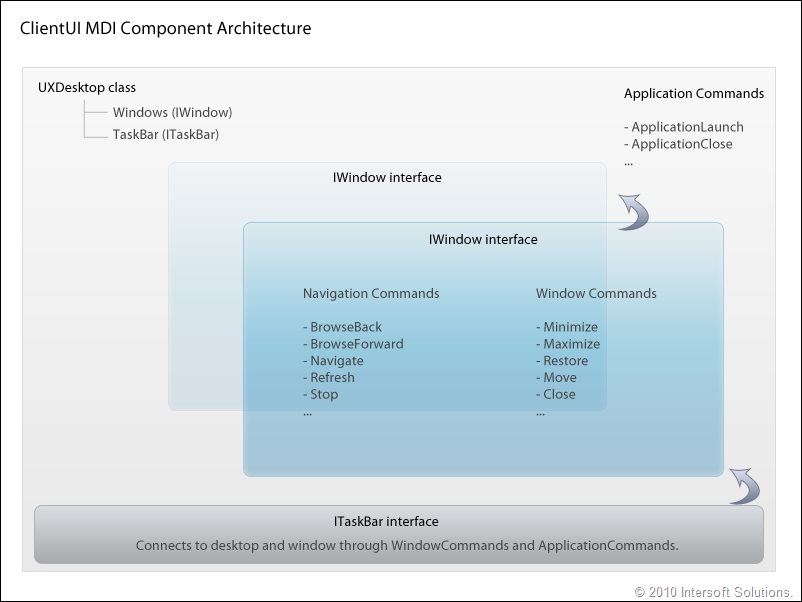
Thanks to our solid framework – the components integration can be designed elegantly through the proper use of the routed events, routed commands, routed input and focus scope. See the following image for more details.
As shown in the above illustration, we took a more generic approach to the MDI architecture such as using ITaskBar naming convention rather than strongly-couple it to UXDock. In fact, the Dock UI is just a kind of the task bar, we could introduce different kind of Task Bar UI controls in the future – who knows, maybe Windows 7-style or uBuntu-style task bar 
That said, these three fundamental MDI components – the UXDesktop, UXWindow and UXDesktopDock – empowers you to create amazing RIA solutions that are very difficult or impossible to achieve previously. To be more exact, the combination of these three components enable you to do the following:
- Launch local XAML applications.
The most basic operation in a MDI pattern application is to display a window that hosts its application content. The way we built our MDI architecture enables you to add windows and launch them in rapid fashion through your preferred IDEs – either Blend or Visual Studio 2010. - Launch external applications.
A more advanced MDI application such as a composite application definitely requires a consistent approach to launch a window that located in an external package (XAP), a technique that some MVVM guys called as Dependency Injection (DI). We took it to a higher abstraction where developers can naturally think external packages as “applications”, much like the application that you can download from Internet and install it in your Windows or Mac OS. This way, you don’t cope with tedious attributes or dozens of interfaces to satisfy – just a simple location discovery would do.In a correctly designed ClientUI app, you can even load the external “application” to the UXDesktop without code changes. You can try this later in the demo app that I put together in the end of this blog post. - Navigate to XAML pages.
In addition to launching an application window, you can also navigate to an UXPage instance that resides either locally or in other packages. When the UXDesktop detects that the specified target is a valid UXPage, it’ll host the page content in UXNavigationWindow instead of standard window. Many of the navigation features that I described in the part 5 of my blog series will work consistently in the UXNavigationWindow. - Minimize windows to a certain location in the Taskbar.
As well as supporting the basic operations such as described above, our loosely-coupled MDI architecture also supports full-featured window management tasks. This includes minimize, maximize, restore, launch and close operation of a window, which should be well integrated to the task bar. For instance, to properly achieve minimize operation, a task bar needs to provide information on the exact position where the window can be hosted.
Each main visual element of a “XAML Application” is commonly represented by an IWindow interface which can be easily referenced through URI semantics.
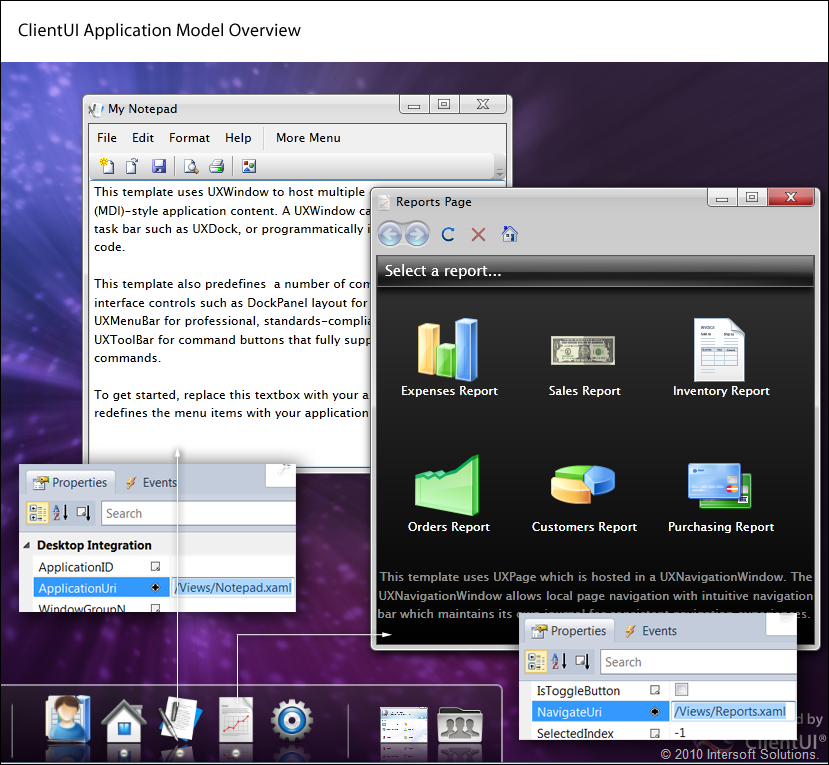
The image below captures the essential concept of application integration in UXDesktop.
As seen in the above illustration, the application and navigation can be easily identified through two key properties, ApplicationUri or NavigateUri. The desktop integration provides more features such as opening single window instance versus multiple window instances.
Another feature that top our list is the automatic synchronization and status notification in UXDesktopDock. This is something that we designed extra thoroughly to ensure the dock buttons and windows are consistently synchronized regardless of the source that triggers the event. I.e., a window can be launched from a dock button, from a stack item, from routed command, or from API.
The following image shows several key features that natively managed by UXDesktopDock.
See It In Action
To demonstrate many of these phenomenal user experiences, I’ve put together a desktop-style sample that loads Contacts application (external XAP) on demand, various window types and sample application content that makes sense to have in such composite MDI apps.
Click here to launch the sample and experience it for yourself.
Build Your Own
We took every step and effort to ensure that our products aren’t just powerful and innovative, but also easy-to-use and developer-friendly. This means that you can rapidly create compelling MDI-style RIA solutions like the one I showcased in the matter of minutes! See the steps below.
Step 1: Create New Desktop RIA Silverlight Application
Launch Visual Studio 2010 from your program group, then choose New Project in the Get Started page.
Step 2: Add New Window
After your new project is created, right click on the Views folder and choose Add New Item. Select UXWindow in the template list and click Add. You can put in some content to the new window, such as a GlassLabel, or possibly an Image.
Step 3: Add New Button and Connect to the New Window
Open the MainPage.xaml, select the UXDesktopDock instance, right click on it and select “Add Button” from the menu. With the new button selected, bring up the property window and look for ApplicationUri property. Type in /Views/MyRichWindow.xaml which is the window page that we’ve just added. Optionally, you may want to assign an icon to the button to easily identify it in the runtime. Let’s choose the striking WhatsNew icon for the button.
Hit F5 to run your project, you can now click on the button and see the window popped up smoothly!
Congratulations! You’ve got a truly rich RIA solution running in just few minutes!
With the ready-to-use templates packed with all rich ClientUI controls inside, that means you can easily replace the content with your real data and put-in some grids. It’s very possible that you could deliver a rich RIA solution in just few days! Isn’t that cool?
Summary
It took us more than 3 years to conceptualize the entire MDI architecture and to get every piece of components to work together. I should also mention that the UXDesktop, UXWindow, UXDock and UXDesktopDock experience doesn’t only run in Silverlight 3 and 4, it also works consistently in WPF 4. Defying the MDI requirements, strict UX challenges and the cross-platform architecture is something very difficult that our engineers are hard at work. And finally we’ve got them delivered.
Well, so far we’ve discussed a lot of possibilities that you now can do in Silverlight using ClientUI – from basic website navigation, advanced multi-level navigation applications, and now phenomenal desktop-style applications with full-featured MDI capabilities. With the solutions we’ve built this far, we hope Silverlight can be seen as a compelling platform for RIA-based business apps, as well as to invite non-Microsoft developers – such as Adobe AIR or JavaFX developers – to build something amazing using Silverlight and ClientUI.
Finally, if you haven’t got yourself a copy of ClientUI RC, please click here to get started with your next innovative RIA solutions. We already have dozens of hot discussions on our Community Forum talking about Silverlight & WPF compatibility, navigation, MVVM, UX, and more. So make sure you post your questions and feedback to ClientUI forum. Enjoy!
All the best,
Jimmy.
Chief Software & UX Architect.





Very nice job.
Will each MDI window run in it’s own thread, or will there be something implemented to help this scenario?
Very nice job, by the way. I like it a lot.
Hi Virgil,
Thank you for your comment, I hope you enjoyed our ClientUI solution.
Regarding the threading, unfortunately, Silverlight doesn’t ship with true multi-threading architecture yet in the latest v4 release. So all the MDI windows will share the same thread.
However, since Silverlight is built on the WPF-style rendering architecture, most asynchronous callbacks or animations are still smooth even if it’s running in several windows together.
There are several possible techniques to simulate the multi-threading for a specific window (let’s say if you need to execute a long process), you can do that by using DispatcherTimer or BackgroundWorker.
Hope this helps,
Jimmy.
Hello, all the time i used to check webpage posts here early in the daylight, since i
like to find out more and more.