Virtual Group Paging with Client Binding – In Depth
As we’ve just released WebUI Studio 2009 R2 service pack, you can now download and try many exciting new features that we included in the release. Read more about the new release here.
One of the much anticipated new features is the virtual group paging capability that we shipped in the service pack, which I’ve discussed in my previous blog post. In this post, I’ll show you the step-by-step walkthrough to use the virtual group paging along with client binding in your application.
The following walkthrough presumes you have been familiar with the client binding and batch update feature that introduced in the initial WebGrid 7 release. To save time and space, this walkthrough will be focused only on the new group paging features. If you would like to see the walkthrough for client binding and batch update, please refer to WebGrid 7 online documentation.
Configuring WebGrid for Virtual Load and Group Row Paging
In this walkthrough, I’m going to use the ClientBinding_SmartBatchUpdate.aspx sample that shipped in the initial WebGrid 7 release. To work with the sample, launch the C# Samples which is accessible from WebGrid 7 program group in the start menu.
Once you got the sample ready in your Visual Studio IDE, click on the WebGrid instance and open Property Window.
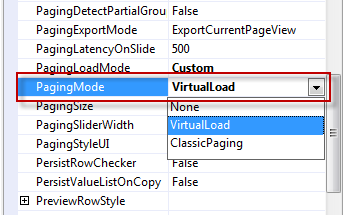
The sample used classic paging mode, so our first step is to change the paging mode to VirtualLoad since the group row paging is an integral part of VirtualLoad paging. To set the paging mode, expand LayoutSettings and set the PagingMode property to VirtualLoad. See below.
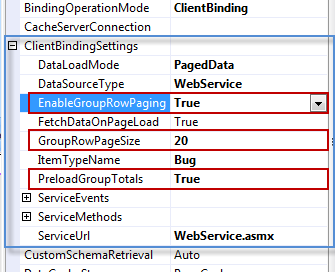
The next step is to enable the group row paging, customize the group row paging size, and optionally enable the preload group totals as well as other client binding related settings.
Still in the Visual Studio’s Property Window, expand the ClientBindingSettings property. You’ll find most of the client-binding related settings centralized in this property group. Enable the group row paging by simply setting its property to true and configure other settings to follow the screenshot below.
We’re done with the WebGrid-level configuration.
Configuring WebGrid LINQ Provider
After configuring the WebGrid to use proper client binding settings and group row paging, the next step is to configure the new LINQ provider in your application.
To use WebGrid LINQ provider in your application, add the ISNet.Data.Linq assembly from WebGrid installation folder to your application’s Bin folder. If you’re installing using default setting, the new assembly should be located in C:Program FilesIntersoft SolutionsWebUI Studio for ASP.NETWebGrid.NET 7.0Bin.
Note that this is a new assembly shipped in the service pack installer. Download the latest service pack installer here, or obtain the assembly in the provided samples in the last section.
Handling Data Operations with LINQ-to-SQL Classes
Since we’re using client binding mode with WebService datasource, we need to specify the ServiceUrl property to the path of the web service that handles data operations requested by WebGrid. The sample used in the walkthrough is using WebService.asmx.
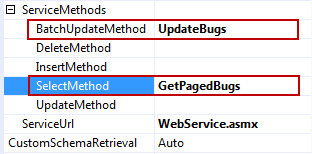
In this walkthrough, we’re going to define the service methods used to perform data selection and batch update. The select method is defined in SelectMethod, while the batch update method is defined in BatchUpdateMethod. The property settings can be seen in the screenshot below.
After wiring the service methods, the final step is to write each web method in the web service that corresponds to the specified service methods above.
Open the code-behind file of the web service to your Visual Studio IDE by right clicking on App_CodeWebService.asmx.cs then choose View Code.
Write the code for the data selection such as below.
|
1 2 3 4 5 6 7 8 9 10 11 12 13 14 |
[WebMethod] public object <strong>GetPagedBugs</strong>(DataSourceSelectArguments selectArguments) { <strong>BugTrackerModelDataContext</strong> context = new BugTrackerModelDataContext(); context.DeferredLoadingEnabled = false; <strong>WebGridDataProvider</strong> provider = new WebGridDataProvider(context.Bugs.AsQueryable()); object data = provider.<strong>Select</strong>(selectArguments); if (data != null) return data; throw new InvalidOperationException("Unsupported operation type!"); } |
So simple, isn’t it?
As I’ve mentioned in my previous post, the Select method of the WebGrid’s LINQ provider automatically handles all data operations – from data paging, grouping, filtering, aggregate computation, group header selection, and group row paging.
I’ve also mentioned that the LINQ provider supports data transaction operations too – such as Insert, Update, Delete and BatchUpdate. The following code shows how to perform batch update using the new data provider.
|
1 2 3 4 5 6 7 8 9 |
[WebMethod] [GenerateScriptType(typeof(Bug))] public TransactionResult <strong>UpdateBugs</strong>(List changes) { <strong>BugTrackerModelDataContext</strong> context = new <strong>BugTrackerModelDataContext</strong>(); <strong>WebGridDataProvider</strong> provider = new WebGridDataProvider(context.Bugs.AsQueryable()); return provider.<strong>BatchUpdate</strong>(changes); } |
It’s as simple as that – thanks to the bare-metal architecture built on the client binding, batch update, virtual load paging and the LINQ data provider to produce this level of component integration.
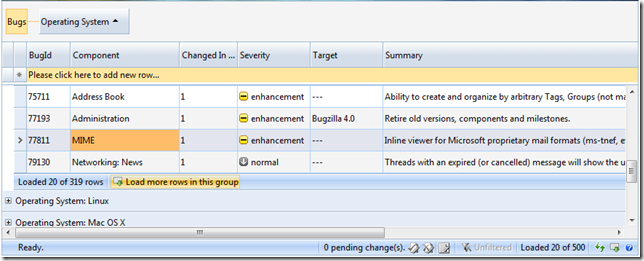
Now save your changes and view your page in the browser. Try to group the column by Operating System and you should see something like the following.
So far, you have learnt how to enable group row paging, customize the page size, activate group total preloading, and use the new LINQ data provider to simplify client-binding data operations. Your next step is to test the new features and implement them in your web apps.
Download Samples
In case you haven’t got the chance to download the full service pack installer, you can quickly download and install the latest bits right from your Update Manager. However, it’s highly recommended that you to go through downloading the full installer to enjoy numerous new and enhanced samples that we included in the release.
You can find the new samples that I used in the walkthrough here. To try it, simply copy the entire folder into the root project of WebGrid C# Samples. I’ve excluded the references to WebGrid and other framework assemblies to reduce the download size, although I decided to include the ISNet.Data.Linq assembly for your convenience.
Enjoy and happy developing!
All the best,
Jimmy.

test
i’m adding a new comment.
Do you have a similar sample using WCF? I can not get the selectArguments to hit my SelectMethod in WCF. I can only call a SelectMethod without any parameters.