Implement Drag and Drop to WebScheduler using WebDragDropExtender
In WebScheduler, events can be dragged and dropped from one cell to another cell in scheduler area. Related to this functionality, we have received requests to support drag and drop behavior from another control to WebScheduler where a new event will be created upon the drop action. Using Build 217 or higher, it is now possible to implement drag and drop behavior from another control to WebScheduler, with the help of WebDragDropExtender control.
WebDragDropExtender allows you to add drag and drop behavior between server or HTML controls. When implementing drag and drop behavior to WebScheduler, you can use any controls as DragControl as long as the drag behavior has been implemented in that control. In this blog, WebGrid is used as DragControl, as the drag behavior is a built-in implementation in WebGrid.
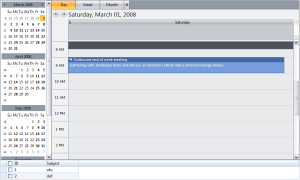
First, add WebScheduler and WebGrid to a page. Ensure all the events and data is displayed properly in both controls before you continue to the next step.
In WebScheduler, the AllowDropFromExtender property needs to be enabled and the editing capabilities need to be enabled as well.
Next, add WebDragDropExtender control to the page. Add WebGrid in DragControls collection and WebScheduler in DropControls collection of WebDragDropExtender.
The following steps are needed to add WebGrid in DragControls collection:
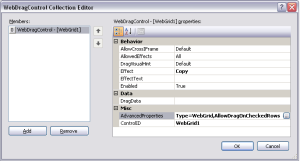
- Choose DragControls property and open WebDragControl Collection Editor dialog box.
- Set WebGrid’s ID as the value of ControlID property.
- Choose AdvancedProperties and AdvancedProperties dialog box will be opened.
- Check Enable special integration with Intersoft control checkbox and check Allow dragging on checked rows checkbox. Note that WebGrid should have rowchecker-typed column.
- Press OK in both dialog boxes.
�
The following steps are needed to add WebScheduler in DropControls collection:
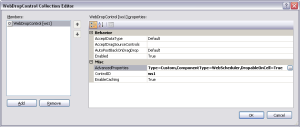
- Choose DropControls property and open WebDropControl Collection Editor dialog box.
- Set WebScheduler’s ID as the value of ControlID property.
- Type the following attributes: Type=Custom,ComponentType=WebScheduler,DropableOnCell=True, in AdvancedProperties property.
- Press OK.
�
Finally, add OnDragStart and OnDragDrop client-side events in WebDragDropExtender control.
Add the following code in OnDragStart client-side event. The code will reinitialize drop controls every time the drag behavior started. This is needed because the selected view mode in WebScheduler might be different every time a drag behavior started, e.g: when user first drags a row and drop it to WebScheduler, the active view mode is Day view. Then, he changes the view mode to Month view. In this case, the drop controls needs to be reinitialized in order for the drag and drop behavior to work perfectly.
|
1 2 3 4 5 |
function DragStart(controlId, e) { var obj = ISGetObject(controlId); obj.ReinitializeDropControls(); } |
In OnDragDrop client-side event, you can implement the drop action according to your scenario. In this case, we will implement the code to add a new event according to the active view mode.
|
1 2 3 4 5 6 7 8 9 10 11 12 13 14 15 16 17 18 19 20 21 22 23 24 25 26 27 28 29 30 31 32 33 34 35 36 37 38 39 40 41 42 43 44 45 46 47 48 49 50 |
function DragDrop(controlId, e, dropObject) { if (dropObject.IsSubObject) { var dropItem = dropObject.SubObjectContext; if (dropItem.ItemType == "Cell" || dropItem.ItemType == "AllDayCell") { var s = ISGetObject("ws1"); var subject = e.DragObject.Data.Rows[0].GetCell("Subject").Text; var startTime = ""; var endTime = ""; var allDayEvent = false; var resourceID = "1"; //currently hardcoded var el = dropItem.Element; switch (s.ViewSettings.SelectedViewMode) { case "Day": case "Week": if (dropItem.ItemType == "AllDayCell") { allDayEvent = true; startTime = endTime = s.GetDateTimeByCellElement(el, "Date"); } else { startTime = s.GetDateTimeByCellElement(el.children[0], "DateTime"); endTime = AddMinutes(startTime, 30); } if (s.IsInSplitViewMode) resourceID = s.GetResourceByCellElement(el.children[0]).ResourceID; break; case "Month": allDayEvent = true; startTime = endTime = s.GetDateTimeByCellElement(el, "Date"); break; } CreateNewEvent(resourceID, subject, startTime, endTime, allDayEvent); return true; } } return false; } |
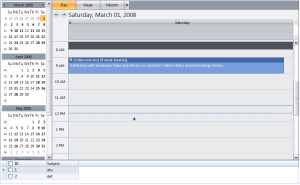
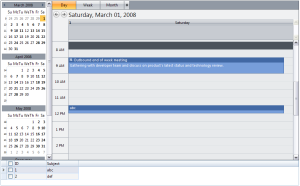
Now, you can drag a row from WebGrid and drop it to WebScheduler in any cell area that you want. The selected dropped area is indicated by a dashed line border in the cell, enabling user to easily see whether or not the selected droppable area is the correct date and time to drop the object.
When the row is dropped, a new event will be created in the selected cell area. Note that previously abc row is dragged from WebGrid and dropped to 12 PM cell area. After it’s dropped, a new event with abc as its subject, will be created in 12 PM cell area with 30 minutes duration (can be specified in the code).
This drag and drop behavior is applicable in view modes that include cells in its layout, so Agenda, Year, and Quarter views are not supported. You can download the sample here. Feel free to give feedback or comments. Have a great day !
